Confetti Drapes Tutorial
Last week I showed you a little preview of what is going on in Etta’s pink and navy bedroom. Thanks for all the sweet comments and what I heard most about was the drapes. And I have to admit I am TOTALLY in love with them myself.
This post may contains some affiliate links. Please see our full privacy policy and disclosure here.


The idea all started when I began planning Etta’s new bedroom. I noticed some adorable polka dots popping up everywhere and I loved them, I just love the graphic look of the trend:

Pure inspiration polka dot art

Like this idea (I know it is stars, but it is one of the pictures I saved!)


But I really loved the idea of morphing that polka dot look into more with of a confetti look. Example from A Place for Us.

Well when I started looking around for my pink and navy fabric to pull everything in her room together, I just couldn’t find the right one. Then my color pallete was set in stone when I got the rug, and it became impossible to find the fabric I needed! Nothing really matched the color scheme I was going for. So I decided that I would make something that did.
This to me is the best feature- the painted polka dots tie together all the colors in the room. I matched the blue paints to the rug we ordered, and the pink to the fabric I bought. I even used the wall paint in the drapes as well, so everything ties together perfectly. (except for the bench which I haven’t recovered yet, so just ignore that!)
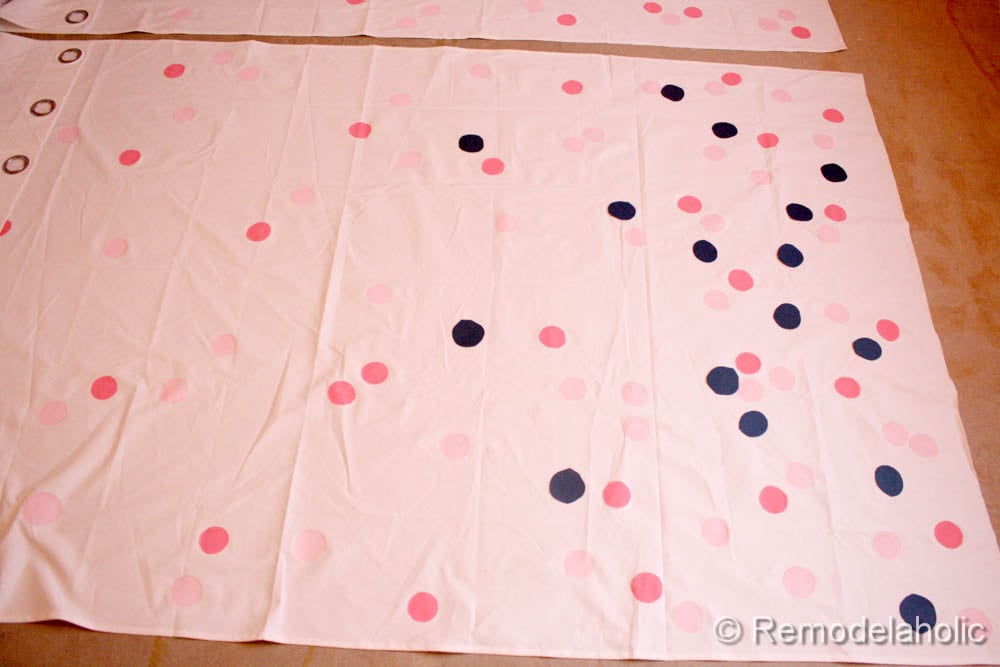
And this is what I came up with:

So, let me tell you how I did it.
Confetti Drapes Tutorial
(this would work for walls, pillows, rugs you name it!)
Supplies:
1 set white Ikea Drapes.
Several colors of paint (including some of the wall paint) I used satin paint from Sherwin-Williams in their Emerald line in SW 6582 Impatiens Pink (walls), SW 6584 Cheery and SW 6586 Heart Felt, SW 6804 Dignity Blue, SW 6718 Deep Sea Dive and a mix of Deep Sea Dive at 25%. (and the White is SW 7566 Westhighland White, although I didn’t use this on the drapes, I actually matched the white I used to the color of the drape fabric, just thought you might want the color!)
1 small cup
1 small flat 1/2″ paint brush (an artists version, not a remodelers type of brush)
1 dinner plate or a paint roller bin would work
1-2 sheets of paper in similar shades to paint
A tape lint roller to remove fuzz and any dirt
Steps:
TIP: you may want to test out a few different cups and painting a few dots on some scrap fabric or even cardboard before starting on your drape panels… I didn’t do this, and there a 2 or 3 REALLY ugly dots permanently on my panels where I figured out what I was doing. Hopefully you can skip that awkwardness, you’re welcome.
1. Lay out your draperies on a solid drop cloth or plastic sheet. (be sure to have a drop cloth or solid plastic sheet underneath. I was working on a concrete floor that was about to be covered with new flooring, so I skipped that step, but I don’t want to be in trouble for painting any of your floors…)

2. Collect your small cup and one color of paint. I used one with a tiny foot or ridge around the edge of the base (they are the old Ikea kid’s cups). Begin by dipping just the base of your cup into the paint in either a small bowl or plate . I used a plate for most of my colors…
*You could try doing 1 or 3 colors at once if you wanna do this project faster, but you might want to try the paper dot tip from below before starting.
 |
 |
 |
 |
3. Make sure the paint is not dripping (it should have about as much paint as the yellow cup above does). Place the cup where you would like the first dot to go. I just eyeballed most of it. Usually one dip of the cup could make 4-5 dots. I would just stamp the next spot or two before filling in the dot using my paint brush.
* My Pattern Plan: Lightest colors were highest on the drapes and darker colors which are more visually heavy are only near the bottom half . I broke the drape into quarters. I started painting with the very lightest color. The lightest color went right up to the top of the drape, but only a few dots at the top and the density grew as it got closer to the bottom of the drape. The second had a few dots near the top, but not as high as the lightest color, getting denser near the bottom. The middle colors started near the 2/3 mark getting denser at the bottom. Finally the heaviest or darkest colors were all on the bottom half only, and especially dense at the bottom. I felt like that system made a lot of visual sense, but you can do what you think works best.
4. When you lift up the cup you should be left with a blobby ring of paint on your drapery panel. You want to work the blobs of paint into the center of the dot and then remove any excess (which I usually just transferred to the next dot). Be careful to try and remove the bead of paint around the dot, or you will have a longer drying time between colors.
 |
 |
 |
 |
 |
 |
Occasionally you might have a slip up like this one below, you can just do another dot, in the same color or a different color right over the top (preferably a darker color than the spot).

5. Work your way through the colors you plan on adding. I allowed the dots to dry completely before adding the next color to the drape. As the drapes got full of dots, (about the 4th color that I added) it became a little hard to be as random with dot placement.
* To help visualize placement and density of the confetti dots, I cut out about 30 paper dots from a tracing of the bottom of the cup (not perfect AT ALL) in the next color. I spread them out and stood up to look at placement. Once I was happy I would just pick up the paper dot and stamp a paint dot on the fabric with the cup, where the paper dot had been sitting. The picture below shows the paper dots as I was getting ready for the next color of paint.
 |
 |
 |
|
 |
 |
And there you have it! A perfect confetti drape tutorial!
p.s. The owls were from Wayfair. They are no longer in stock, but they do have other owl figurines to choose from.


What do you think?
Cassity Kmetzsch started Remodelaholic after graduating from Utah State University with a degree in Interior Design. Remodelaholic is the place to share her love for knocking out walls, and building everything back up again to not only add function but beauty to her home. Together with her husband Justin, they have remodeled 6 homes and are working on a seventh. She is a mother of four amazing girls. Making a house a home is her favorite hobby.


These are the most adorable things ever!! Your color choice and placement are spot on. Love ’em. Want ’em!
Thanks Megan, that is such a nice compliment! It is so much of just testing things out as you go! I am glad thy turned out!
Love those drapes! They look terrific.
YAY! Thanks Korrie!
I already shared my love for the curtains when you posted about them previously, but I STILL can’t believe you made them. They are gorgeous! LOVE LOVE LOVE! And definitely so perfect with the rug & the whole room.
Thank you Sarah! I love hearing that you guys like the project! Makes my day!
This is SO cute!!
Thanks Jess!
These are so wonderful. I’m in the middle of decorating my sweet little boy’s room and I am looking at painted curtains. I was thinking chevron or rugby stripes, never occurred to me to try polka dots. Love love love!
So fun! I think these are SO versatile! If you do it I hope you share the project with me! I would love to see it!
I definitely will! In the meantime I featured this tutorial on my “Stuff I Love” favorite things list this week. You can find it here: https://thequeenoutnumbered.blogspot.com/2013/06/stuff-i-love-im-seeing-spots.html
I love polka dots!! The curtains are too cute!! Thanks for the tutorial! They look great in her new room. Love them!!
Thanks Crystal!
these are SOOOOO adorable!! wish I would’ve found these before making my curtains for our nursery! I LOVE these!!!
Oh bummer! Thanks though for loving them!
Super awesome!! The curtains look adorable and where did you get that rug from? It’s beautiful.
Tanya I got it from Wayfari for a great price, I think there is a link in the post!
I saw these on Pinterest and am definitely considering making some for my little girl’s room in our new house. We now live within an hour of IKEA – so excited!
An hour from Ikea can be dangerous! Believe me I know from experience! I hope you love them as much as I love mine!
Oh my gosh! I absolutely love this idea!!! We just found out we are having our first baby and this is definitely going to be an idea for me if we have a girl! It’s so adorable. Thanks for sharing!!!
Congratulations! Oh a new baby! That is SO exciting! Good luck boy or girl babies are the best! Good Luck!
Thank you! We are very excited! =]
I ABSOLUTELY LOVE THEM!! Such a refreshing take on polka dots!! Amazing job!
Thank you Stephanie!
Love these! How long did they take you to do?
Mary it took e a few days!!… but it doesn’t have to take that long, you could do 2 or 3 colors at once and it would go a lot faster. The thing that made it take a while is the drying time in between colors.
So sweet and adorable! I love them!
Thanks for the comment Nicki!
LOVE these. I am mad for polka dots, but this confetti look feels so updated and fresh to me! ADORE!
THANK YOU! I love the confetti look too!
These are adorable! I really love them – thanks for the tutorial, you’ve made it look so easy 🙂 Now I’m going to have to scout out a room where I can try this myself… x
Thanks for the nice comment Kimberly
I love these! I’m having the same problem finding the right fabric in the color scheme for my daughters room. I mean I found some but at $75/yard I think I’ll pass. I might come up with a similar version for my girl! Thanks for the idea!
Blessings,
Kayla
You are welcome! Let us know how they turned out!
Hello
I just have to say that i love those curtains. Ive been looking for curtains like that for my sons room and couldn’t find anywhere and didn’t think of doing this. I just wanted to ask you though, did you use fabric paint? Or just regular wall paint? Did u have to put 2 coats and does it scrunch up when u open the curtains and crack? Before i do this i want to be sure 🙂
Thank you
Theodora, Cassity used just regular water based latex wall paint. She applied just one thick coat and it doesn’t crack at all when bunched up. I hope that helps. Good luck with the project!
I have come to profess my undying love for this DIY.
I had envisioned a world where my living room had super cute, brightly colored confetti print drapes to give a fun pop to my otherwise monochrome (lack of) color scheme. Alas, my search was going about how yours was… there were no confetti curtains to be found that really matched my polka-dotted dreams. As I was about to give up and settle for these super-cute-but-not-exactly-what-I-wanted drapes from Plum & Bow , I decided to see if anyone else had dreamed my same colorful dreams, and that’s how I ended up here!
This was a super fun and easy tutorial and no one should be intimidated by it! I finished mine in just about three and a half hours (working nonstop). I used acrylic paint for most colors and a little leftover wall paint for others – mine were pretty dry by the time I finished each drape so I didn’t have to watch my steps TOO much. I also used my Martha Stewart foam pouncers instead of a cup as well as the brush method for smoothing and filling. These are so worth all of the midnight oil that I burned! I now have drapes that are perfect and are exactly what I wanted.
Thank you so much!
-Michelle
I love these and want to do them in my daughter’s room. She has 2 windows though, do you think 2 sets would be too much?
Thanks so much, super adorable!!!
HI Cassity,
I am planning on doing this curtain project in my daughters room. I have recently painted the room and have SW paints with me. My only question to you is “Have you washed the curtains”?
Does the paint hold up washing ?
Regards,
RT
We have not washed them yet. Great question though. I think it should hold up fine though. You could try it on a small piece of fabric and wash it to test it.