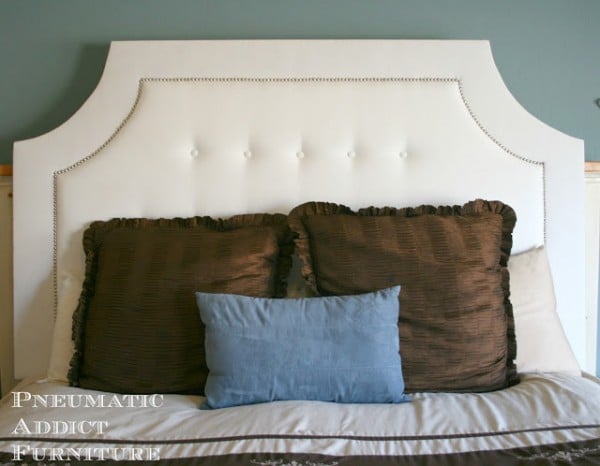
Make a Tufted Leather Headboard
Hello Remodelaholics! It’s Thalita from The Learner Observer again, back with another DIY for you. Today I’m sharing a project near and dear to my heart head! It’s my white tufted leather headboard!

How to Make a Tufted Leather Headboard
This project was a major learning curve for me, and to be honest, at time it was frustrating. However, I now get to share all of my mistakes with you, tell you what not to do, and you’re all better off for it! First, let’s start with what you’ll need.
Materials
- Plywood (7/16 4×8′ cut into a 3×5′ piece at Home Depot)
- Drill and 5/16 drill bit
- Two 2″ twin mattress foam toppers like this – mine cost a LOT less! I have seen RE ones at Target for $14.99!
- Adhesive spray
- Cotton batting like this – shop around! Sometimes fabric stores have sales (as was the case with mine).
- Staple gun and staples (I swear by this one. I have used it for every reupholstery job so far like the kitchen chairs and folding chairs)
- Waxed thread or embroidery thread – I went with embroidery because I’m a rebel. Waxed thread won’t break, so I suggest you go for that! It was a hard lesson I had to learn.
- 28 buttons
- 1 long needle – one meant for actual upholstery, doll making or anything longer than 2 inches will work!
- Leather or fabric of choice – my piece was about 5 1/2×4 feet which was JUST enough. I used Leather Hide Store’s Soft White.
- Patience
Now here we go. In 10 steps, you’ll have a tufted headboard of your own!
Step 1
Have your plywood cut at the hardware store, or cut it yourself into a 3×5′ piece – this is the size needed for a Queen-sized headboard. (If you’re making a different size, consult this post for more details about headboard sizes.) Sand any rough edges from the cut.
Step 2
Measure your where your “tufts” will go. I even made a handy little chart for you!

Now is the time to drill all of the holes using the I did not follow my own instructions and proceeded to step 5 before drilling. BIG mistake! So drill now, please! Ignore the batting you see in my photo. That should not be there!
Step 3
Dry fit your batting onto the plywood and get ready to spray some adhesive. I used a double layer of batting, since I used the inexpensive mattress foam. Stick it all down before cutting.

Step 4
Now that the foam is glued on, cut off all the excess from the sides. Good quality scissors or a serrated knife will work well!
Flip your soon to be headboard onto the cotton batting, foam facing down. See how I don’t have any holes in mine yet? Yours won’t look like this because you have learned from my mistake!

Step 5
Staple all of the batting along the edges, being careful in the corners to cut off any excess batting. You don’t want it all bunched up.
This is where I learned my hard lesson. I tried to drill holes at this stage and would up with the batting all caught up in the drill bit, forcing me to remove everything and drill without foam and batting. It was brutal.

Step 6
Repeat the previous step, except now, instead of batting, lay the leather facing down. Only staple the top or bottom of your headboard at this point!
Step 7
Leaning your headboard against a wall or something heavy, thread your needle and starting at the back of the headboard, pull the needle to the front and through a button, then again towards the back and staple the thread to the back of the headboard, pulling tightly! Just keep the leather hanging naturally. It will create some subtle diamond shapes when you finish.

Step 8
Keep going until you think you cannot possibly sew through leather any longer! It’s pretty tough, but worth it in the end. I chose buttons to match the leather as closely as possible for a monochromatic and classic look, though I was tempted to go for some brass buttons!

Step 9
Once you have completed all buttons, staple along all of the edges of the headboard, pulling tightly for a nice, finished look.

Now you can sit back and stare at your beautiful work of art! That’s what I did, anyway! Here’s a close-up of the tufting:

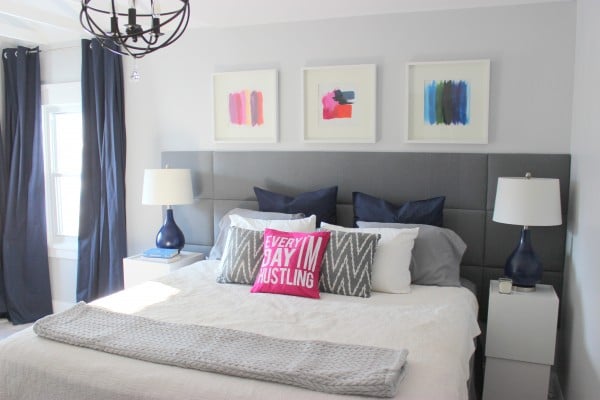
The headboard can be mounted on the wall, but it depends on the kind of bed frame you have. We have the Ikea BRIMNES, so the headboard fit perfectly snuggly between the mattress and the wall – super lucky!

Now that the master bedroom is all finished, the headboard really brings it up a notch. I love that it’s understated and classic, so it allows me to have any kind of decor, should I ever want to switch things up!

Have you ever tufted a headboard? Would you try it with leather? Let me know your thoughts and questions in the comments section – I love hearing from fellow Remodelaholics!

—————————————
More tufted headboards:
click each photo to see each tutorial

Thalita is a mom of twins, teacher, and blogger over at The Learner Observer. She is a frugal DIY-er and avid lover of thrift store scores with a passion for making over spaces with pieces that are both meaningful and beautiful. Favourite colour? White. Favourite food? Ice Cream. Favourite Pastime? Instagram, where she shares an abundance of pictures of her twin boys along with her latest home reno and decorating adventures!


This is nearly exactly what I intend to do. Only 2 differences: My headboard will have a frame and the tufted leather will be between it. I have a dresser and nightstand painted 2 tone with chalky finish paint from Lowes. The cabinet is one color and the drawers white. I will carry that over into the bed.
The other difference is the buttons will be metal. Does anyone know where to find them? A lady at Joann Fabrics suggested drawer pulls. I am seriously considering it. Everything would be exactly like yours, except I would put screws through the hole and attach just like to a drawer.