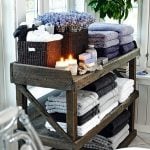
DIY Vintage Crate Shelf
Hi! It’s Amy from Hertoolbelt back with another build plan. I don’t know if it’s just me, but Pinterest has been telling me that I need to get organized. I’m sure it’s right. Why not get organized with some cool shelves like this open shelf, these ideas, or a rolling vintage crate shelf. The inspiration for this plan comes from this unique rolling shelf made from vintage crates.

If you like to go junking/thrifting and can score some vintage crates, this project becomes very simple. However with a pallet or two, you can make DIY ‘vintage’ apple crates fairly easily. If you’re not into building crates, this project can also be done with new store bought crates.

How to Build a DIY ‘Vintage’ Crate Rolling Shelf
Materials
- 1 or 2 weathered pallets
- 1 – 2″x4″ board
- wood glue
- 1″ nails/screws
- 1 1/2″ nails/screws
- 4 swivel casters
- 1 – 1″ x 4″ x 8 board – optional
Step 1
Disassemble the pallets and save the pallet slats. When I disassemble pallets I like to keep the nail holes for added character, but it’s not necessary. The width of pallet slats vary greatly, I have made this plan using 4 1/2″ and 4″ wide slats. Adjust the plan according to the width of your pallet slats.
Cut List
| Quantity | Thickness | Width | Length | Material |
| 12 | 1/2″ | 4 1/2″ | 18″ | Pallet Slat |
| 12 | 1/2″ | 4 1/2″ | 11 1/2″ | Pallet Slat |
| 9 | 1/2″ | 4″ | 18″ | Pallet Slat |
| 12 | 1 1/2″ | 1 1/2″ | 9 1/2″ | 2×4 cut on a 45 |
Cut the 2×4 on a 45 deg angle down the length of the board to make the corner supports. You can easily make this cut with a table saw or circular saw. Cut the corner supports to 9 1/2″ lengths.

Step 2
Use wood glue and 1″ screws or nails and attach 2 of the 11 1/2″ slats to 2 corner supports, repeat to make 6 of these crate ends.

Glue and nail or screw 2 of the 4 1/2″ x 18″ slats to each side of the crate ends.

Turn the crate upside down and glue and nail/screw 3 of the 4″ x 18″ slats to each crate bottom.


Step 3
If your crate wood is not in great shape, you may want to consider attaching/screwing the swivel casters to 1″x 4″ x 10″ boards first, then glue and nail/screw the 1″ x 4″ boards to the side of a crate. 
Otherwise attach/screw the swivel casters to the side of one crate, in the 4 corners.

Step 4
Apply glue to the new ‘top’ of the crate with casters. Place another crate side onto the glue and nail or screw (1 1/2″ min length) the 2 crates together. Try and get the nail/screw through the one crate into the other crate’s corner support for a solid attachment. Repeat for the middle and the top crate.


For other home storage ideas, check out these free plans.
 |
 |
 |
 |
Crate Storage Coffee Table // Shoe Storage Bench // Small Open Shelf // Media Console
Amy is the tool lover at Hertoolbelt. On Hertoolbelt, Amy shares DIY furniture plans, handyman tutorials, and craft patterns. She has three pint sized 'helpers' that help fix things around the house and build fun projects.


Well Done, great job 🙂