For Vanity’s Sake; Upstairs Bath remodel; Part 4
The continuing story:
In my quest for affordable remodeling, reusing things is a must. The bathroom vanity doors usually match the kitchen cabinets and can therefore be used elsewhere, like we have done before. My other train of thought is, that I am sick of the boring, stock vanity cabinets that are usually used in cookie cutter homes like mine.
While I was drawing up the plan, at first I thought I would find 4 new doors that matched at the Habitat Re-store. Then, I realized that might be impossible. My next option was to remove the base cabinet doors altogether and only have to find one large door, or two smaller doors for the cabinet Justin is building to go over the toilet. This is the option I chose to go with.
But what to do with the vanity? I didn’t want to rebuild it, or have to remove the counter top which is in fine shape for a kid’s bath. Here is what I came up with, and I love it so much, I plan on trying it downstairs as well.


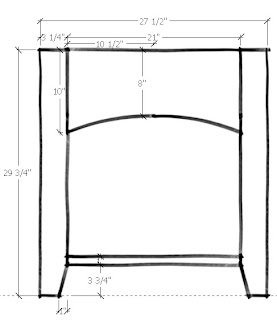 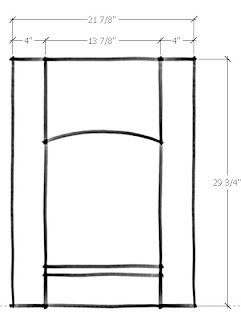 |
Bathroom Vanity Remodel plans!


It is seriously one of the cheapest, easiest updates we have ever done. And, you have my permission to use this awesome idea, but please, if you blog about it, link to my blog, and let me know what you did.
Here is the link to Mirror Mirror on the Wall: Part 5
Cassity Kmetzsch started Remodelaholic after graduating from Utah State University with a degree in Interior Design. Remodelaholic is the place to share her love for knocking out walls, and building everything back up again to not only add function but beauty to her home. Together with her husband Justin, they have remodeled 6 homes and are working on a seventh. She is a mother of four amazing girls. Making a house a home is her favorite hobby.


>LOVE it! You guys are amazing!
>I love this new bathroom. Cass has done a great job with it. I can't wait until I can finish the cabinet and show it to ya'll. It is going to look amazing.
>You make it sound so easy! I look at your pictures and think….i have no idea how she just did that!! It looks awesome! I love how you took the cookie cutter standard vanity and made it beautiful and so fun! I seriously wish I lived closer to you!
One question…if you and Justin could pick one tool that is mandatory for an at home fixer-upper, what would it be?
>I just stopped by from TLC and wanted to say that your vanity redo is GORGEOUS! What a frugal and fantastic project. What vision you had.
Great job.
XO*Tricia
>So pretty, I love the design that is not standard. THANKS FOR SHARING AND HAPPY NEW YEAR
>It looks great! I love the curved front!!!
>Looks Great!
>Oh my gosh. You'd never know it was the same vanity! I LOVE this. And wouldn't that curved front look awesome as well on a tall bookcase? Thinking here..
Thanks for linking up to SNS!
FJ Donna
>Wow!!! Yes I do like it. Wow!!! Great job.
I am having an apron GIVEAWAY on one of my blogs. I would love for you to check it out.
https://copingwithacidrefluxandulcers.blogspot.com/
>That is super brilliant! Totally inspired by this!!!
Amy
>Great idea! It looks really pretty!
>Oh wow… that looks fantastic!! Great job! 🙂
~Jennifer
http://www.studiojru.com
>I love the arch! This looks so chic + cute. I can't believe you found a box that fits nicely (and adds a nice touch of color) underneath.
>Well it may have been cheap to do, but it sure doesn't "look" cheap! I love this!
Kat 🙂
>Great job! I did something similar with bead board on mine. Really makes a difference. Lezlee
>That really is super! Very Clever for sure!
smiles, alice
>I don't know you but I love you!!! This is exactly what I need to do in my bathrooms – maybe both of them! My kids bathroom would be just like this. I could do it in my master too. Oh, the possibilities!!!
>Is there anything you can't do? This is such a smart fix for the common vanity. I am always impressed by your work.
>Love the helpful hints. We are struggling with what to do in our bath on an almost non-existant budget. This gives me some good ideas on what I might be able to do. Thanks for following my blog (from FF) I'm following you, too.
>Hello! Found your blog and I'm happy I did! This bathroom idea is brilliant. I have been racking my brain on what to do with mine that is almost exactly like yours. I thought about getting the doors from habitat for humanity too but thats a pain. This is what blogging is about. It's so nice to stumble upon someone who helps solve a problem! nice job chica!~