Kitchen Redo With Dark Gray Cabinets & White Subway Tile
Submitted By This Little Mama
By far the kitchen was my favorite room in the entire house! I created the kitchen to how I wanted my kitchen to be {ya know, since I would be the one doing all the baking and cooking}. We completely gutted the kitchen, replaced the electrical and then built it to our needs. We painted the kitchen cabinets a dark gray (SW Peppercorn) and just used builders grade cabinets. We added molding to the top of the cabinets to create the look of custom built cabinets. I chose white subway tile as the backsplash. All the appliances were new but purchased in the scratch and dent department of the appliance store. Luke really wanted to put a breakfast bar separating the kitchen and the dining room. Ultimately we decided that doing that would not be a very space savvy plan so instead we built a 30 inch long wall to center the entryway of the kitchen & dining room.
Okay enough typing here are the pictures:

Kitchen- Before

Kitchen- Before
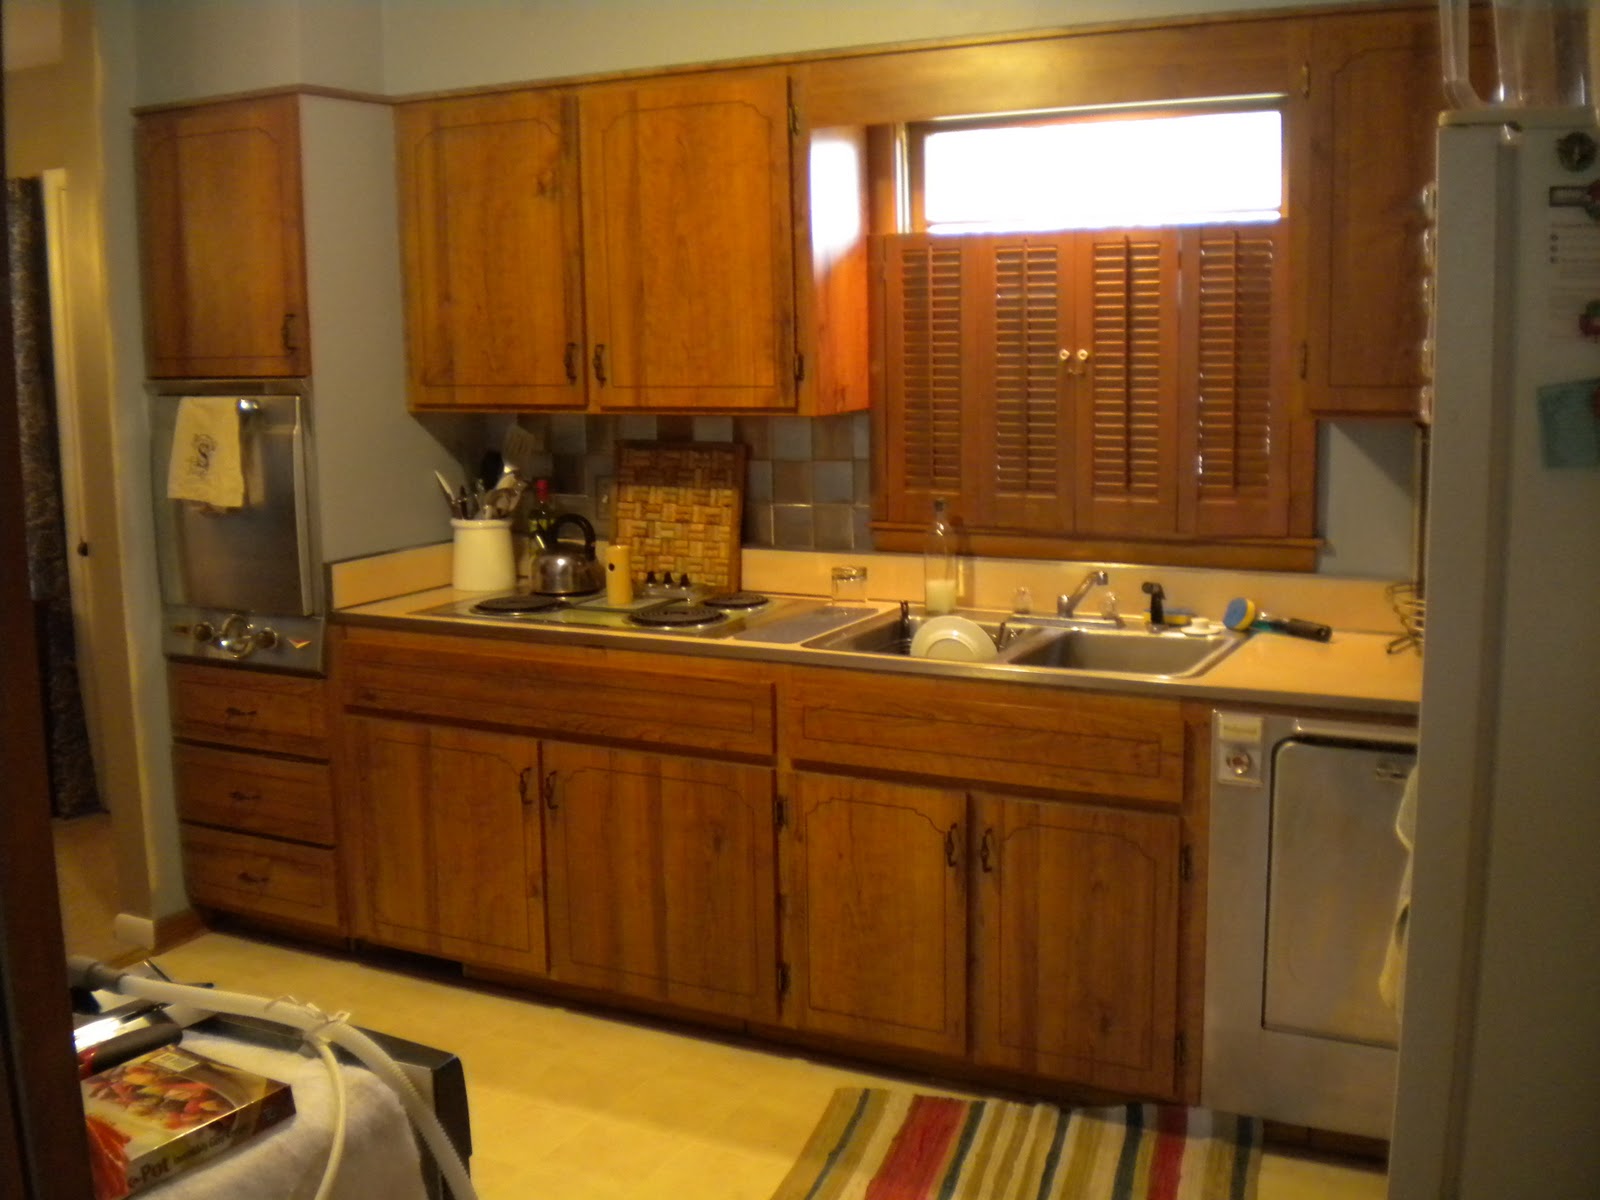
Kitchen- Before

Kitchen- Before

Kitchen- During

Kitchen- During

Kitchen- During
And FINALLY!! The pictures only 2 pictures I have of my finished kitchen (hey I had a newborn, pictures were the last thing on my mind)
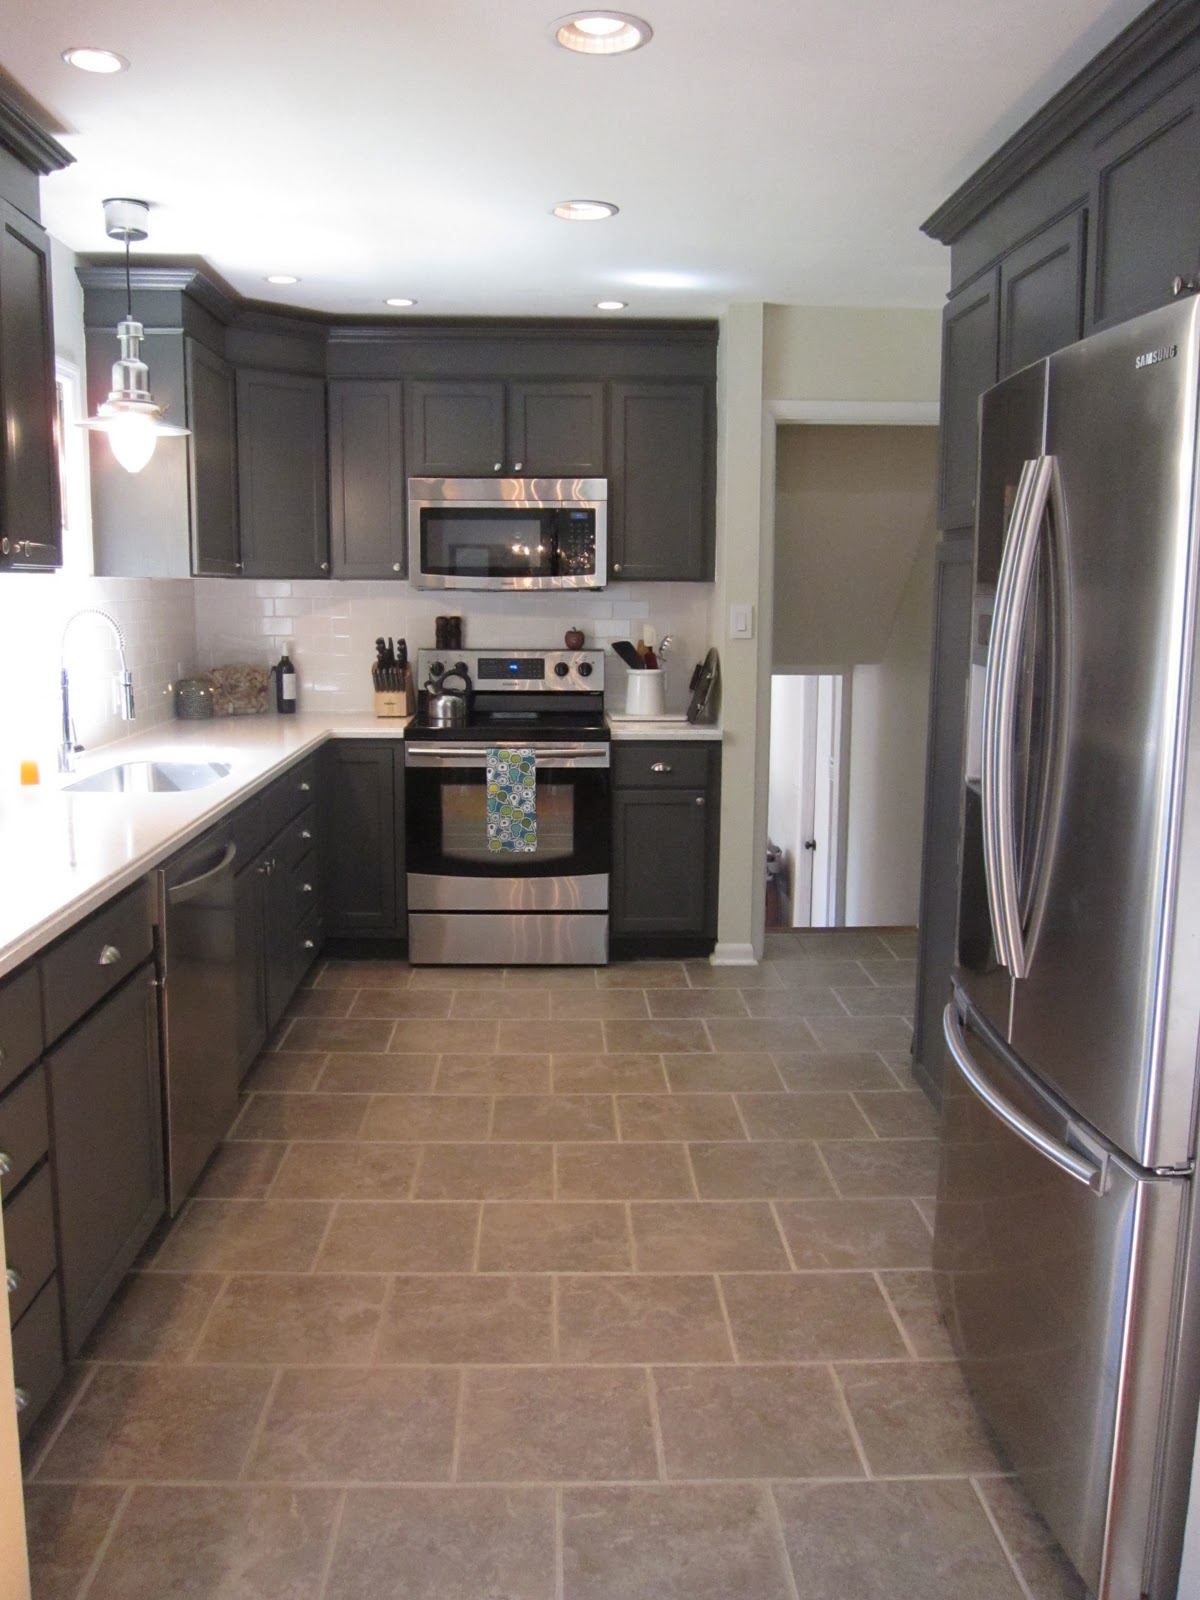
Kitchen- After

Kitchen- After
We did everything in our kitchen by ourselves with the help of a couple friends. Our neighbor just happened to be an electrician so we got lucky there. All the new appliances were scratch and dent- we really didn’t spend as much as you would think {except I splurged on the countertops}. When we sold the house the inspector and other real estate agents thought our cabinets were custom built- which made my hubby so proud! It was a lot of hard work and took a while to do since we didn’t have much help but in the end it paid off!!
Well what do you think? We loved it! And now we miss it- but we’ll fix up another kitchen and love it just as much!
**Since I have had a few emails about certain things in the kitchen, here is a breakdown for those of you wondering.
Kitchen Cabinets:The Cheap-o builders grade cabinets from Home Depot- we sanded, primed, and painted them.
Hardware- Home Depot
Faucet– Home Depot
Light over sink-Ikea
White Subway Tile Backsplash-Home Depot cheap stuff again
Appliances:We bought all of our appliances from scratch and dent. Our dishwasher was from Home Depot and our microwave, stove, and fridge were from the local Sears Scratch and Dent store (all together under $1500!! The fridge was originally $2500ish and had one small dent on the back and a very very small scratch on the front- I think we paid $800 for it)
The sink came free with our purchase of the solid surface countertop
The hanging shelfunder the cabinets is from Ikea
Counter tops are Corian with gray specks in them. Home Depot (I think this was it Silver Birch– but it looks more gray online)
Ceramic Tile flooring- once again the cheapest stuff we could find. Those babies were $1/sq ft. We matched them up to the expensive stuff we really liked and they were the same thickness so it was a no brainer to save as much $ as we could! We like how it turned out!
I am the husband of the amazing Cassity of Remodelaholic. I love to problem solve and to design and build things inside and outside the house to make life better. I am a professional Landscape Architect by trade and love the outdoors.


Gorgeous. I love the dark charcoal gray cabinets with the white. I would have selected that myself – well I sort of did, since I have white uppers and dark gray lowers and white beadboard backsplash. Well done and I’m amazed you did all that with a newborn.
what a fabulous redesign
of a dated space
her kitchen is now
light
bright
and modern
not to mention
shiny
thanks for sharing!
alison
So pretty!!! I love that! So nice to see a kitchen featured on a DIY site that is NOT WHITE!!
I agree! While I love white kitchens, mine is not. It is nice to see how others are working with color.
Beautiful!
That is fabulous. We will soon be redoing out kitchen and it has to be gutted and a wall torn down. It is an old family home. I love to see how wonderful yours turned out. It is so scary to see all the steps you took but it was so worth it. You would never know you used the cheapest things and made them look expensive. Cuddos!!!
Your kitchen is the same shape as ours and I’ve been racking my head on how we can re-do it. even just seeing where your stove and fridge are is a big help. I hope you don’t mind if I take this picture to use for ideas for our kitchen! it’s brilliant!
Please tell me what the name and brand of the paint color on your cabinets. You did an amazing job on your kitchen and I’d like to use a similar color on my cabinets. Thanks.
I agree with Kelly! Could you please let us know the paint color/brand? It looks incredible! I am so bad at telling how a tiny paint sample will look on all of our cabinets!
Thank you!
Amanda
Loving this giveaway!!!! Good luck to us all!!! 🙂
Great Job! Love the colors you used. And, for all of you “lookers”: you just need to “READ” the post for info on paint color/brand. SW Peppercorn…..
Howdy!
Your cabinets look fabulous. I’m wondering what finish of paint you used and did you use a brush or roller to apply it. Any tips you can provide would be great. Going to do the same to my cabinets.
Kind regards,
Shanna
Shanna,
This was a guest post so i am not totally sure about he paint finish, but there is a link to the original author at the top of the page. Good Luck!
Wow very nice job on your kitchen. I am very interested to know how u do the paint work on the cabinets. Did u use a roller or brush or even a spray gun to do the job? Any close up shots of how it turned out? Again great Job on the project
Just beautiful – we had charcoal cupboard 2 houses ago – for this house we went white and now you’re making me wish I’d gone grey again lol!
LOVE !!!
xox
I’m a big, big fan of all the cost-cutting solutions you found! (I’m one of the few that finds it ridiculous to spend thousands on kitchen upgrades). Great job, beautiful!
Thanks for the comment, Kristin!