Sewing Closet Revamp; Using Every Inch Wisely!
I am so excited to share my new sewing closet with you today! I wish I could just sit in there and stare at it all day. As you may remember, my motivation to do anything creative has been non-existent since the holidays. A good part of this was due to the fact that my sewing area was a complete wreck. About a week and a half ago I committed myself to getting my sewing area remodeled and organized by the end of January. Well, I didn’t waste any time. I have to first and foremost thank my husband for helping me to make it all possible. It took us a full weekend to get everything painted and built and then I took last week to get everything organized and put away. I can’t stand to wait any longer! Here’s the before and after…
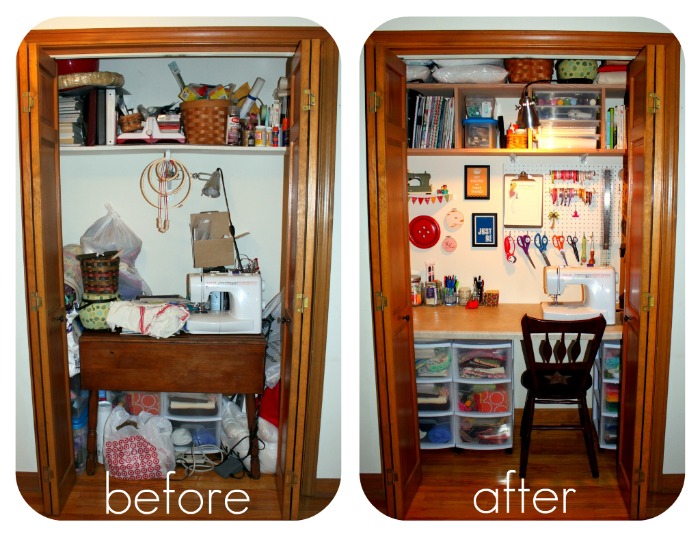
Isn’t it incredible?! I never imagined it would turn out this great. I’ll tell you a little bit about the building process, and then I’ll take you on a little tour of the finished closet.
First thing, I completely emptied the closet and removed the shelf and shelf supports that were in the closet. Once everything was out, I spackled all the holes in the walls. After that dried, I sanded down the spackle and then used a damp cloth to clean all the spackle dust from the walls and trim.
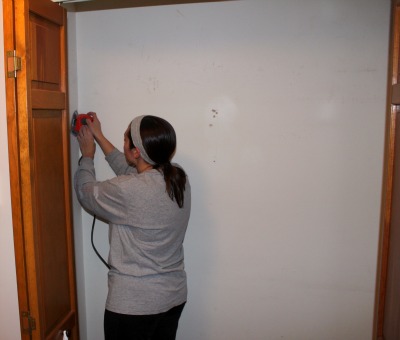
Next up was paint. I decided to go with Linen White because there is some sitting in our basement from the previous owners of our house (in other words, it was free!) I wanted a fresh, crisp look. After I taped all the trim and rolled on the paint, I had an empty closet with a clean canvas as a starting point.
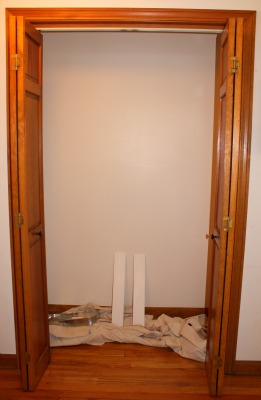
Those two boards leaning against the wall are the side supports for the new bottom shelf. I painted those when I painted the walls.
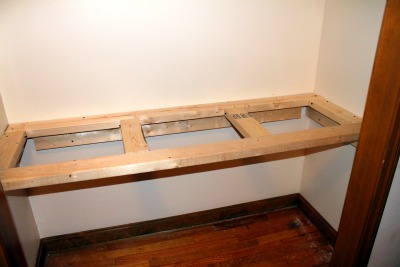
Next came the shelving. My husband and I installed a shelf across the entire width of the closet. We then attached a 12.5″ tall piece of the same board against the wall on either end of the shelf. We were then able to add a second shelf on top of those boards. I then measured along the bottom shelf every 14.5″, and we installed three 12.5″ tall dividers between the two shelves. I decided on the dividers to help organize the shelf and contain all of my craft, sewing, and decorating books.
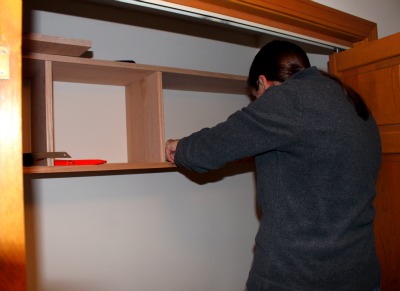
Once the dividers were up, we added two metal brackets to help support the center of the shelf.
Next came the desktop. We were originally planning to use a couple of planks and lay them side by side, but we ended up springing for a piece of laminate countertop at Home Depot. It was $66, but it was well worth the money. It provides a really nice surface to sew on. In order to support the countertop, we had to build a frame out of 2x4s. Tip: Make sure each board in your frame is level before you attach it. This will ensure that your countertop is level when you place it on the frame.
The countertop itself was too deep for the closet, so we used a circular saw to cut off the backsplash so that it would fit. It was also about a foot and a half too long, so we had to cut down the length of it. We were scared to cut the countertop, but it was super easy! Here’s what you do: determine where you need to cut, and place a strip of masking tape or painter’s tape centered over the cut and along the entire length of the cut. Mark your cutting line right on the tape, and cut right through the tape/countertop. Works like a charm! Use the tape, otherwise you might end up cracking or splintering the laminate.
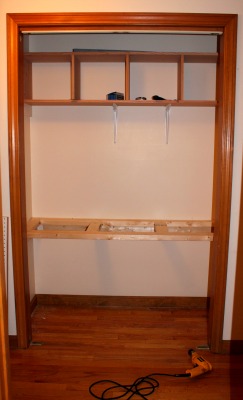
After the countertop was cut to the right size on the third try, we set it on top of the frame and screwed through the 2×4 frame right into the countertop. The final piece was a framed pegboard that was hanging inside one of the closets when we bought our house. I positioned it on the wall above the countertop so that it would cover the metal support braces under the shelves. The very last step was to install an electrical outlet in the closet for a light and my sewing machine. And voila, I’ve got a sewing closet!
Now for a little tour of my finished little space…
The outer shelf cubbies hold my craft, sewing, and decorating books. The two center cubbies hold boxes filled with buttons, elastic, glues, scrapbook paper, paints, glue guns, and paper punches. The very top shelf holds all of my pillow forms, polyfil, and baskets full of extra supplies. It’s kind of nice because that area is sort of hidden from view from outside the closet. Under the desktop are three rolling carts with drawers. This is where all of my fabric, interfacing, and batting reside.
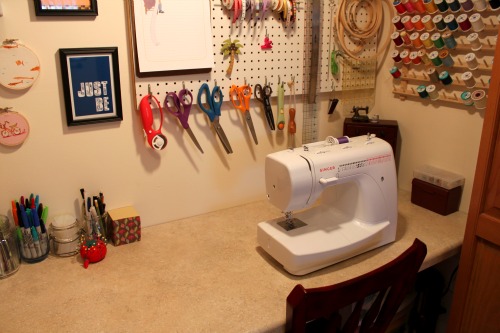
Here is the desktop area…
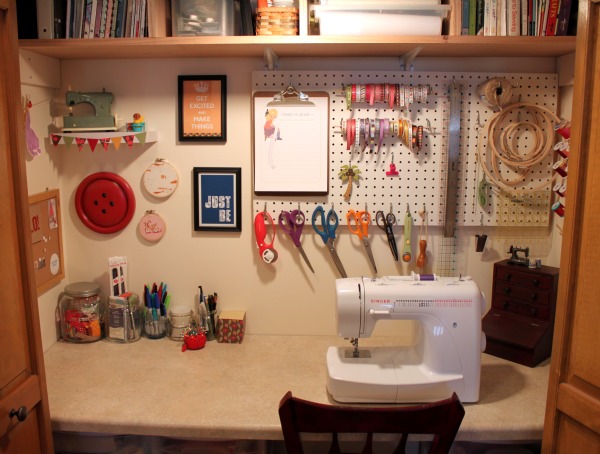
The jars on the desk are filled with ribbon, zippers, ric rac, Sharpies, glue sticks, pens, and pencils. I also have a little notepad cube and pin cushion.
My pegboard holds my scissors, rotary cutters, bias tape maker, rulers, embroidery hoops, twine, small spools of ribbon, a clipboard for jotting down ideas, and a little palm tree (just to make me smile).
Here’s the view to the left…
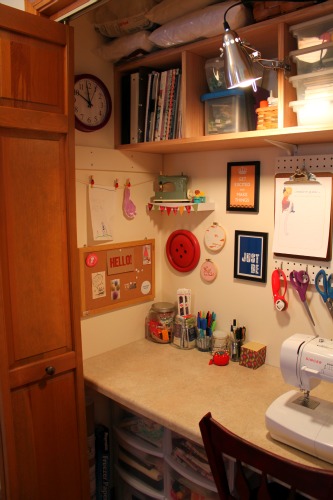
The little clothesline displays some of my oldest daughter’s artwork. The tack board has cards from some of my favorite Etsy shops, including a letterpress “Hello” card that came with an order from this Etsy shop.
Here’s a closer look at the decorations on the wall. Remember when I bought this old Hasbro Necchi Supernova toy sewing machine last fall? I finally have a proper place to display it…
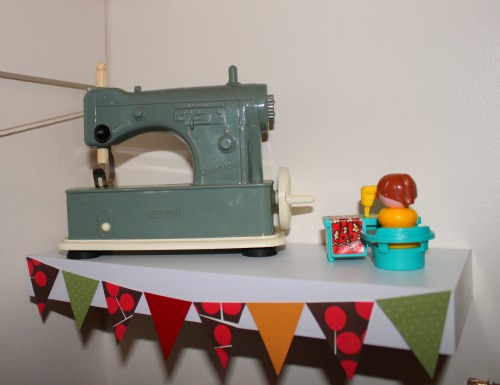
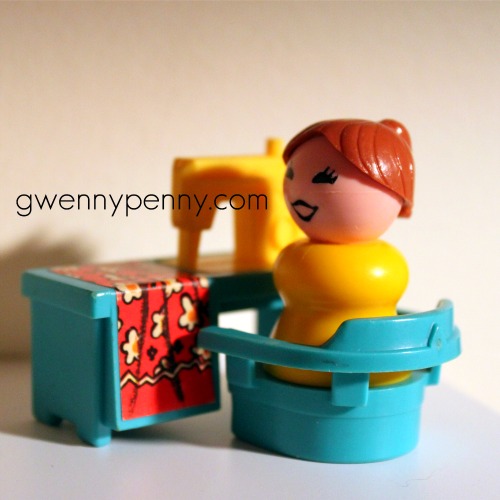
The little shelf came from Target. I taped little paper flags onto the front. And to the right is my vintage Fisher Price Little People woman at her sewing machine (although I hate to say vintage because I had one of these as a kid, and it makes me feel old). Love her…
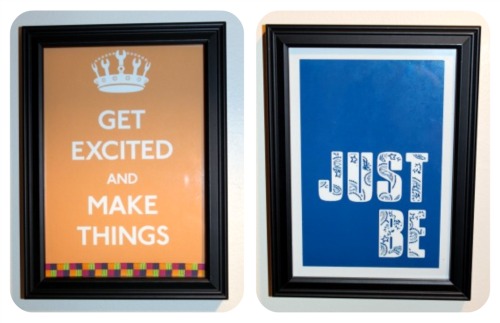
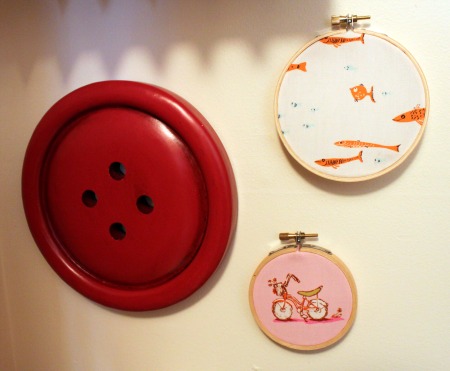
I also have a couple of framed pieces that I really like. The first, “Get Excited and Make Things”, I found through Alissa at 33 Shades of Green. It’s a free printable from Pretty Procrastination which can be found here (in four different colors!). The second, “Just Be”, I made myself. It’s something I’m trying to remind myself to work on this year.
I also have a ginormous button that I bought at JoAnn’s last fall, and two little embroidery hoops with pieces of some of my favorite Heather Ross fabrics in them.
And now the view to the right…

All of my thread is stored on the rack on the wall. The number 4 vintage marquee number was an Etsy purchase a while back. And in the very back corner of the desktop is a little wooden box with drawers for storing more sewing tools. On top is this cute little metal sewing machine that I recently dug out of the basement…
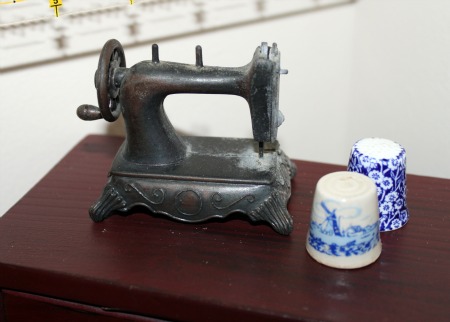
I don’t even know where it came from. I just always remember it sitting on a shelf in my room growing up. I had completely forgotten about it. I found it when I went looking for the thimbles. I used to collect thimbles when I was a kid, and these are two of my favorites.
This completes the tour of my new sewing closet. If anyone is interested in building something like this, and you have any questions, please feel free to email me. I’m certainly not an expert, but I can tell you what worked for us. This is a great way to carve out your own sewing space if you don’t have an extra room in your house or if you live in an apartment.
Thanks so much for stopping by today! And an extra big thanks to those of you who stuck it out through the whole post… it was a long one. Now that I can get to my sewing machine, I’ve got some work to do!
Cassity Kmetzsch started Remodelaholic after graduating from Utah State University with a degree in Interior Design. Remodelaholic is the place to share her love for knocking out walls, and building everything back up again to not only add function but beauty to her home. Together with her husband Justin, they have remodeled 6 homes and are working on a seventh. She is a mother of four amazing girls. Making a house a home is her favorite hobby.


>Your closet, (almost said room) is just adorable! I love the little accessories. You made the most out of that little space. I am a new follower, can't wait to see what you do!
>Oh what a great job you did on organizing your sewing closet!!
>I l.o.v.e it! 🙂 The little fun touches just top it off perfect too!
>What an amazing transformation. My hubby was peeking over my shoulder and said, "Wow, that's insane!"…a compliment 🙂
I love all your embellishments, especially the big button, "vintage" Little People lady and the "Just Be" sign.
Can you come to my house and build one for me? 🙂
xx-Kristyn
>It looks SO great and I am surprised at the amount of stuff that you've gotten in there and it still looks so organized… and even decorated! I love it! I especially love the little vintage sewing machine and Fischer Price sewing lady (I remember having one too!)
Tania
>fantastic closet makeover…love all the cute little touches!
>So great to see someone actually use a closet for a fantastic sewing/craft space! Nice job!
>Thank you so much for sharing my sewing closet transformation, Cassity!
>Absolutely beautiful!! What a wonderful fun space to "create"!! Love all of your li'l added touches.
I have a child's sewing machine similar to yours! I started young, too! 🙂 You can see mine on my blog:-
https://ladybuglair.blogspot.com/
Just click on "craft room clean-up" under Labels and you'll see it on top of my sewing corner cabinet. I have other fun stuff to see, too — a sewing wallhanging, mannequins, etc.
>You sewing closet is so organised, love it
>What an amazing transformation! You must feel so liberated, and wish you had done it ages ago now as intended.
>Wonderful feature! Gwen's sewing closet is a super transformation and very special creative space!
>Love it Gwen – what a big difference from what you started with! And I LOVE the Fisher Price Little People lady – I don't remember that one! And thanks for mentioning my blog too!
Alissa
>How awesome is this?! You certainly made the most of that closet. I love all the little details you've added.
>That is awesome!! I know how hard it is to organize craft stuff.
>WOW WOW WOW … I am so envious. I wish I had a closet I could do this too. Such a great use of space : )
That looks fabulous! Just wanted to let you know that I’m featuring it on my “Top 10 Organized Spaces” post! Feel free to drop by and grab a button that shows that you were featured!
That’s fantastic! I love your little Fischer Price lady with her sewing machine.
Just adorable and creative. I know you’ll enjoy. PS I collect thimbles too.
I am going to be doing a similar remodel this summer. How wide was your closet? I know this is from 11 years ago. But I love it. I want a place to sew that I can just close the door and leave everything ready for the next time. I don’t want to use a whole room. My closet from side to side is 78 inches.