How To Make A Shaker Cabinet Door
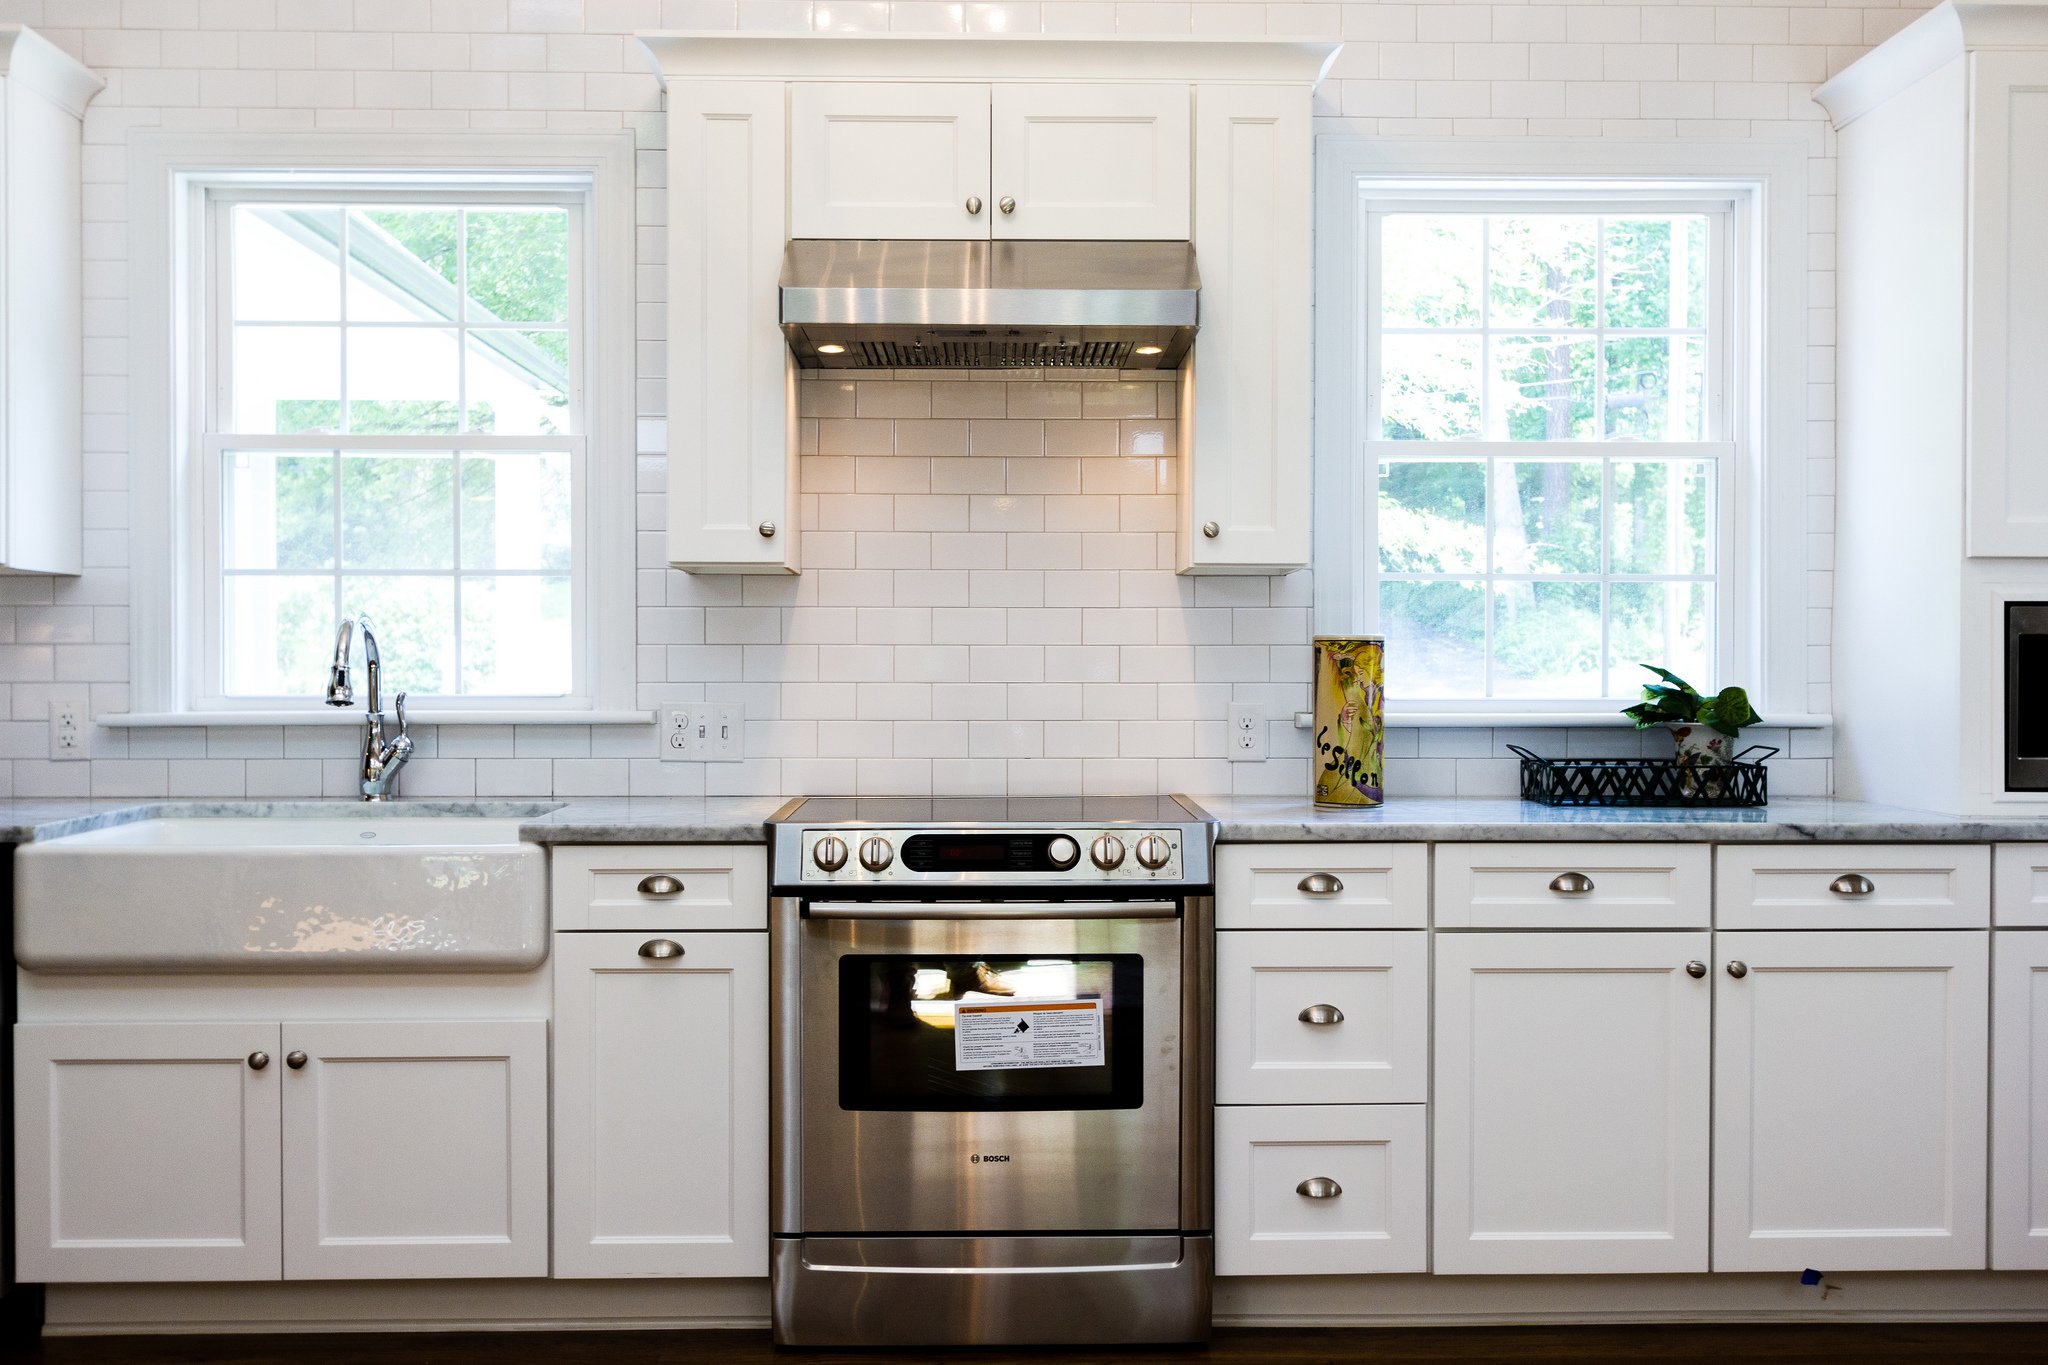
Hi everyone! It’s Jill from The Rozy Home and I am here to share a tutorial that will change your life. I know what you are thinking – “Jill, it’s just a cabinet door. What’s the big deal?” As you know, cabinet doors easily make or break the style of your kitchen. If your cabinet doors scream their decade, painting them makes a huge difference – but the fact remains they are still dated. Why paint when you can easily make a shaker cabinet door yourself?

For this tutorial I picked the hottest cabinet style in kitchens – shaker. Not only do shaker cabinets make a dated kitchen current, they are also incredibly easy to make. All you need is oak strips, plywood, wood glue and a table saw. That’s it! (If you have flat panel cabinets already, you can update them to be shaker style like on the drawer fronts here.)
How to Build a Shaker Cabinet Door
Step 1: Determine the cabinet size.
This is pretty simple. All you have to do is measure the opening of the cabinet and then add the desired overlap. Most people opt for 1/2 inch. Example: Your cabinet opening is 17″ x 37″ so you would want your shaker cabinet door to be 18″ x 38″. In the illustration below, the grey represents the overlay of the new cabinet door.

Step 2: Gather your materials.
When selecting cabinet doors there are a couple of options in regards to wood. Due to the ease of finding, I usually opt for red oak. Red oak is strong and can easily be stained or painted to your desired color.
The stiles of the shaker cabinet door (the pieces that make the frame) are usually 2″ wide and 3/4″ to 1″ thick. Luckily this can be easily found at most home improvement stores. An 8 foot piece of 1″ x 2″ red oak strips is around $10.
For the panel (the center of the cabinet door), you will use 1/4″ red oak plywood. Again, these are easily found at most home improvement stores. A 4′ x 8′ piece is around $25.
Step 3: Cut your stiles and rails to length.
In the example above, an 18″ x 38″ cabinet door would have 2 – 38″ vertical stiles and 2 – 15″ horizontal rails. To determine the horizontal rail lengths, take the overall width (in the example, 18″) and subtract approximately 3 inches. Each vertical stile is roughly 2 inches wide and the horizontal rail will set in 1/2″ on each end (2 inch rail width – 1/2 inch inset = 1 1/2 inches per side).

Step 4: Cut your dados.
Dados will change your woodworking life. Or at least they have for me. A dado is a grooved joint sized to fit another piece of wood closely (also called a groove, as in tongue and groove)

Making a dado is actually pretty simple. For this project, you will want to create a 1/2″ dado in each of your four stiles (the plywood will slide into the frame via the dad0).
Begin by adjusting your blade height to 1/2″.

Place the vertical stile a little off-center and run it through the table saw.

Turn the stile around and run it through again. When you are finished, it should look like this:

Although cutting dados is not hard, I would suggest you practice with “junk wood” that is the same width. When making this tutorial, I went too far off-center and ended up with this:

Yeah, I was WAY off center. This happened because I eye-balled it. The best way to stop this from happening is by marking center on the wood and then having the blade line-up on the actual edge of the line.
To ensure your groove is the right width, grab your plywood and do a test fit. If it snaps on, your groove is perfect. If it’s too small, widen the groove as needed. If it’s too big, scrap the piece and start over.

Repeat this process on the other vertical stile as well as the two horizontal rails.
Step 5: Cut your tongue.
Ok, ouch! No, not that tongue. The tongue is the edge of the wood that will fit inside the dado (or groove). Doing this is a bit more tricky (but still easy). Again, I suggest using junk wood to practice.
Begin by adjusting your table saw blade to around 1/4″ (actually a little less is better).
Next, move your fence so that it is 1/2″ away from the center of the blade.
Run your horizontal rail through on both sides and both ends. You should end up with this:

Move your fence 1/4″ closer to the blade and run the horizontal rail through again. Continue to move your fence closer and run the horizontal stile through until you have created a tongue. The final piece should look like this:

Yes, it’s a bit dipped in the center but that’s okay (as long as it’s not like that on the whole piece. If it is, it will not fit right).
When all pieces are cut, they should look like this:

Step 6: Measure/cut the center panel.
Fit all of your pieces together to get an accurate measurement of the center panel.

As you can see, there are small gaps on the edges. No worries… those will be resolved quickly.
Measure the width and height of the opening.

Add 1″ to the overall width and height of the opening. Use these measurements to cut your center panel.
Step 7: Add the center panel.
After cutting the center panel, slide it into the frame to check for fit.

If you are satisfied with the fit, remove the panel and apply glue to the grooves of each panel.

Slide the panel back in and place the top horizontal rail in place. Clamp the shaker cabinet door and allow to sit for at least 30 minutes.

I always double check the width of a door when clamping by measuring at each clamp. When I first began working with clamps I would tend to clamp one side tighter than the other – resulting in an uneven finish on the final product. Measuring at each end is a quick and easy way to make sure you haven’t over-tightened (or under-tightened) your clamps.
Allow it to dry overnight.

And that, my friends, is that. Simply sand and stain or paint your shaker cabinet door, add some awesome cabinet handles and hinges and you are good to go.
It took about 15 minutes to make each door (not including the time it took for the glue to dry). Cost per door is around $20 (you can get about 6 center panels from each sheet of plywood).
In as little as a weekend, you could completely transform your kitchen by making your own shaker doors. Not only are they stylish and easy-to-make, but the tongue and groove joint will ensure they hold up to the daily abuse in the kitchen.
Coming up in #ShutTheFrontDoorDIY:
(be sure to subscribe by RSS or email to get updates for every post of Shut The Front Door DIY week)

Jill has been working for years to make her house into her forever home. With a love of high-end details, Jill works to recreate a high-end look on a DIY budget.


thank you for this . I was going to try this a little differently but your way is a lot easyer than mine.
Great instructions for the DIY’er, except the pictures are not the 1×2 recommended in the write up! Beware if you use 1×2 the thickness of your edge pieces will be a full inch or more smaller than what is pictured.
That’s what I was thinking when reading it. Not to mention, 1x2s never have nice straight edges like in the picture. I wonder what size boards were actually used?
Hi all! I actually went down to the garage and grabbed the wood I used to make the cabinet door because I was beginning to think I had mistyped. It is 1″x2″. Oddly enough, the tag from Home Depot with the measurements is even still on the bottom of one of the pieces. As far as the flat edges, I used the Select wood. It cost a bit more, but they plane down the edges so it is nice and smooth/even. It’s what I use for the majority of my building projects. As far as the glue -vs- non-glue. I would say it depends on who you ask. Bob Vila has a video where they make a cabinet with a custom cabinet builder and they used glue. I tend to follow what Mr. Vila suggests. 🙂
i built my cabinets a few years ago and i did as you have done.. in the center island i put big drawers for my pots and pans as i hate reaching so far and hurting my shoulder. this is a really nice cabinet door and as you say very easy to do. i am 78 years old and i finished them about 6 years ago
Can you tell me if this is the board you used? On most boards, the “actual” is way smaller than the size on the tag, so I’m struggling to figure out if the 1″ x 2″ is actual or just what’s on the tag.
Thanks! This is great- exactly how I plan to build my cabinet doors. And for a glass faced cabinet, can’t you replace the center plywood with a sheet of glass, and use caulk instead of wood glue?
Panels in cabinet doors should be free floating and NOT glued into the grooves. This allows for expansion and contraction. The frame (rails and stiles should be glued and the panel lose in the grooves.
That’s critically important for a large solid wood insert panel, as failure to do so will almost definitely result in cracks. However, these doors use plywood for the insert, which consists of at least three layers (plies) of wood with the grain direction oriented perpendicular to one another. Wood only significantly expands along one axis (across the grain), so the perpendicular plies glued together hold each other against movement. As such, gluing plywood center panels in place should be fine in terns of movement, and should result in a stronger panel overall.
For proof that this works, look at pretty much any building which used plywood for sheathing and tightly nailed the panels in place rather than using slotted holes. 🙂
I have always put small rubber spacers inside the rail to hold the panel in place. It gives room for expansion but also stops the panel from moving.
It would be a shame to have your door laying flat whilst you stain it, then when you pick it up the panel shifts and you have a few mm of un-stained panel.
I have never glued a panel to the rail either, other than MDF for the reason that if you get glue on the face of the panel, it will show up through the stain.
Id love to see peoples projects though! I make custom cabinets as a career and have not tried this at home with tools that don’t cost more than my house 🙁
I would stain or paint the panel prior to assembly and for class panels, I stain or paint the rabbit prior to assembly. A little latex caulk prevents any panel movement in the frame.
You can glue plywood but avoid when using solid woods due to expansion and contraction which is eliminated when using plywood.
I really appreciate this tutorial and website. Well done. I doors look great.
Matt is correct. The panels should NOT be glued into the frame. Glue should only be applied to the tongues of the rails. Also, if you plan on staining your project, take extra care to prevent any glue seeping out of the seams, or immediately wipe it clean. Stain will not take to any area where there is glue residue.
You can glue plywood but avoid when using solid woods due expansion and contraction which is eliminated when using plywood.
Thank you for this tutorial! Very clear instructions and was looking at making one door for my custom built fish tank! I will attempt this on a weekend and loved the tips of do’s and dont’s – very helpful!
It seems every other door I make is slightly warped such that not all four corners are on the same plane.. How do I fix or avoid this?
Thanks, Tony
I read on another site that it is best to paint the door pieces before attaching them together. Is that a good way?
when gluing up door with solid wood panels (i.e. raised panels) they should NOT be glued to door frame as the solid wood will move with seasonal humidity changes. This is why we paint and or stain wood panels before putting them in frame so that any movement (shrinkage) will not show raw wood. Plywood panels and or MDF panels do not suffer those movements and can be glued to frames. Glue up should take place on a dead flat surface and just enough pressure should be used with clamps to hold parts together. too much clamp pressure can squease out too much glue and cause door frame to twist causing the one corner or opposite corners lifting. keep a damp rag ready at clamping time to wipe up and glue that may prevent paint or stain from finishing door.
Hello, first let me thank you for putting this great tutorial together! I am am building these doors for my bathroom. Twice I cut the rails too short and I couldn’t figure out why. I triple checked my measurements and the instructions for subtracting 3″ from the width and it was short. I figure it was because 1 x 2 is the nominal measurement but the actual is 3/4 x 1 1/2. Once I adjusted for this it came out just as expected. So instead of taking 3″ off, I only take 2″. Because 1 1/2 (actual) – 1/2 (inset) gives you 1″ per side.
Hope this helps someone else who is new to woodworking!
Thanks again!
Albert C.
Thank you for the update Albert! Yes, the measurements are usually 1/4″ off – something I’ve never quite understood. I’m glad you were able to figure out and took the time to share your insights!
The boards start out at 1×2, but then they put them through the jointer and the planer and they end up smaller.
Really cool Tutorial. I am building a built in entertainment center soon. I am just going to paint them white.
After the doors are complete can you give me any advice about sanding them? It sounds like a stupid questions but I was mostly wondering about the edges of the doors? How much do you sand the edges down to keep them looking nice? Must be personal preference but just wondering what some of you guys did after they were built? Thanks.
Simple cabinet doors, the problem I had was getting the dado in the center of the wood. Several atempts and several scrap pieces later I found the center. Use less expensive soft wood for the trial and error learning curve. I used a stacked dado blade that made the process a little faster. Sanding the corners with a random orbit palm sander finished the doors to be painted perfectly.
One easy way to ensure that your cut is perfectly centered is to flip each piece (rotate 180 degrees if looking down at it from the ceiling) and run it through a second time. This way the two cuts are perfectly symmetrical. The second cut should be taking off very little material. Just make sure that the slot still fits your panel before cutting all of them.
Never glue the panel to the stile and rail. The door bust during natural sweling of te wood. It is a shaker because of the sound the door makes. Make the pannel 1 /8 smaller and only glue the tounge of the rails.
Yeah, not the reason it’s called “Shaker”….
“Shaker furniture is a distinctive style of furniture developed by the United Society of Believers in Christ’s Second Appearing, commonly known as Shakers, a religious sect that had guiding principles of simplicity, utility and honesty. Their beliefs were reflected in the well-made furniture of minimalist designs.”
What depth overlay edge mount plates would you use for these doors? 1/2″?
Floating panels allow the wood to expand and contract with moisture. That means don’t glue them. Don’t worry. If you did it like you did, they won’t get away. =)
Very nice work.
In the future DON’T glue the panels They should sit loose, thus allowing the wood to breath and expand in the summer time. Reason: if you glue them and it’s too tight the panels could split or cause subtle warping of the frame.
You can however, glue the styles and rails together.
I built similar doors for the kitchen three years ago, practice is the key. Used a stacked dado blade on the table saw to make the dado and the tongue. Practice. took the assembled sanded doors to a local auto body shop for painting, a coat of household primer followed by a coat of household paint (top coat). The paint finish is awesome and durable. Set up and practice practise practice took hours, then each door took about an hour to construct, glue, assemble and sand.
Thanks for sharing your experience, Ed1
Thanks for sharing your experience, Ed.
First of all great tutorial, you explained everything very well. Just a quick comment on how you recommended cutting the tongues. You can do it the way you did and it works, however it’s much safer to support the wood with a miter sled or the miter guide on the saw. Wide pieces have a tendency to rotate when pushed along the saw fence and can actually kick back and seriously injure you. If you youtube table saw kickback you’ll see what i mean. Be Safe!
-cheers!
Thanks for the tip, Miles!
Since I do not have the woodworking tools ( routers, table saw, etc.) but I do have the slab old kitchen doors, could stock moulding be overlayed on of the existing doors/drawer fronts to achieve the shaker look???
Yes! That would look a lot like how Thalita did her doors here: https://www.remodelaholic.com/inexpensive-diy-custom-cabinet-doors/