Unique Drawer Shelves
Check out this wonderfully fun and unique idea to use that old dresser you are not needing anymore! See how Katie turned the drawers into adorable drawer shelves for her walls!!
Submitted By: Shades of Grey
Hello, I’m Katie from Shades of Grey. I am a stay at home mom in Dallas, TX. I moonlight as a Photographer & Etsy Shopkeep of GreySkiesBlue. I think everything looks better painted teal, I can smell a glue gun from a mile away, and I never get a haircut that doesn’t include bangs. I started my blog, Shades of Grey, after my son Greyson was born but BEFORE 50 Shades of Grey came out… just clarifying. My blog basically kept me from completely going insane throughout the newborn stage. I try to keep it real on my little slice of the internet. Motherhood isn’t for sissies, sometimes the laundry doesn’t get done for a week {or two} and my DIY projects don’t always turn out how I pictured. I am so excited Remodelaholic is featuring my dresser drawer shelves. They are one of my favorite DIY projects and they balance out all the Ikea in my apartment. I would love to see you over at my blog theperfectshadeofgrey.blogspot.com, stop by and say howdy!!
I was working with a limited budget (>$20), but I knew I wanted shelving and I knew I wanted it to be something you don’t see everyday. Then I had a thought: Dresser Drawer Shelves. I was sure it was an original idea until I searched Pinterest and found a few other people had already thought it.
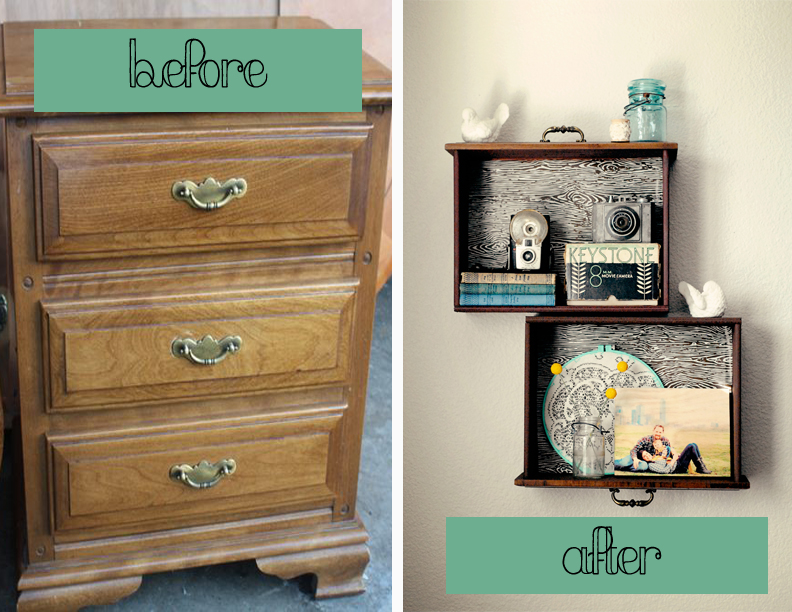
Bummer. Apparently there really is nothing new under the sun. But, I figured I could my own spin on them to make them uniquely ours. So here is how they turned out:

I’m tickled with the end result!! They add some much needed charm to our Ikea’d out apartment.
For this DIY Project I used:
1. Drawers. Preferably made of real wood. I found mine at a local thrift store. The nightstand they came from was $10 and I asked if I could just take the drawers and leave the nightstand for the store to dispose of. They obliged. (You might want to check the free section on Craigslist or Freecycle and you could score some for free, I had no such good fortune)
2. Paint- I used 3 small bottles of acrylic craft paint in dark brown.
3. Sand paper
4. Wrapping paper- I used this roll from the Container Store. It was left over from a project I did in Grey’s nursery. You could also use wallpaper or contact paper I suppose.
5. A glue stick or double sided tape
6. Nails, hammer and laser level
Time: 1-2 hours
Cost: $12 for the drawers and the paint, everything else I had on hand
The Process:
First, you will need to sand down the sides and back of the drawers. I decided not to paint the front of mine because I liked the wood grain and the hardware.

Then give those babies a good coat of paint. If you are lucky enough to find some cool vintage drawers with joints and character you could really skip the painting all together, but I was not so fortunate so I painted away. I gave my drawers 2-3 good coats of paint and that seemed to do the trick.
After they dried, I cut my wrapping paper to fit into the bottom and glued it in (You could totally get away with double sided tape if you pleased).
Hanging them on the wall was pretty simple for me, just two nails for each drawer. But I can see how it might get tricky if you get drawers that are a little different than the ones I have. I recommend looking at the bottom of the drawers before you decide to run with the project and make sure they will hang flat on the wall.
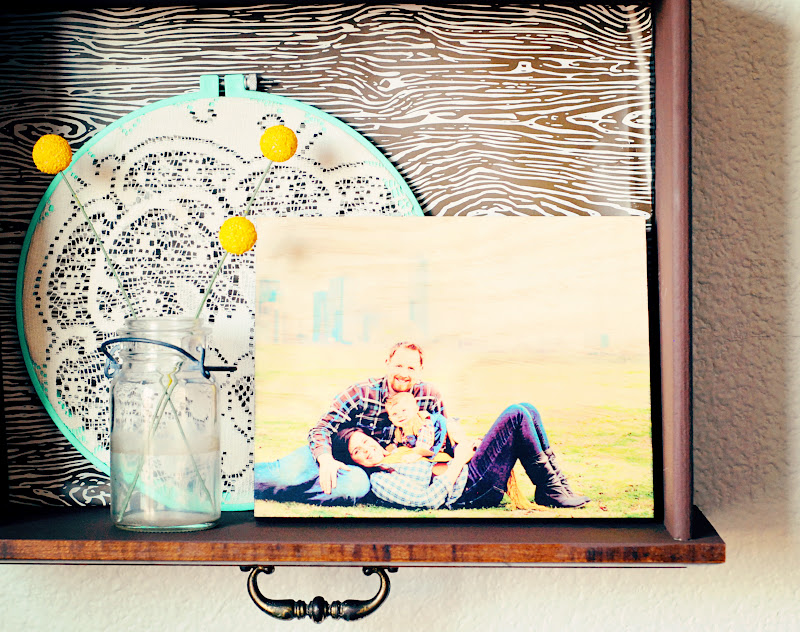
After they were up, the fun part began… dressing my new drawer shelves. I ran around my apartment like a kid on Christmas morning snatching up treasures.


I forgot to snap a photo of the nightstand “before” but I found one really similar on Google. Who doesn’t love a good before and after? I know I do!
Yay for the feeling of accomplishment. And when that feeling comes at a $12 price tag it feels even better. Now go get your DIY on!
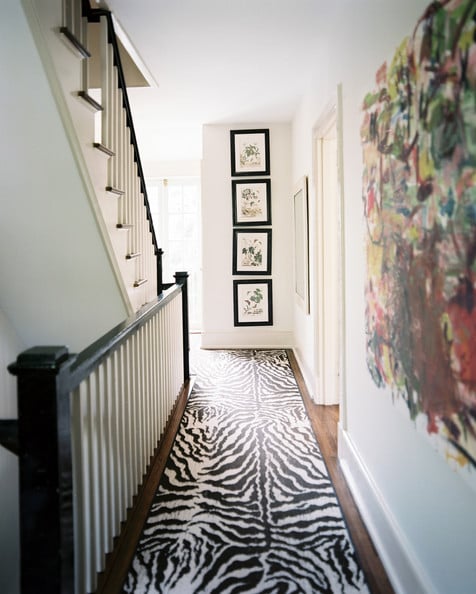
Check out some other funky dressers here!


![]()
Cassity Kmetzsch started Remodelaholic after graduating from Utah State University with a degree in Interior Design. Remodelaholic is the place to share her love for knocking out walls, and building everything back up again to not only add function but beauty to her home. Together with her husband Justin, they have remodeled 6 homes and are working on a seventh. She is a mother of four amazing girls. Making a house a home is her favorite hobby.


love love love. 🙂
This is a really creative idea, and I love your photography too!
Thanks Aimee!!
I love the birds…I just bought a pair of them!!
These are really great! Love this project and am now going to be searching for that perfect nightstand that I can re-purpose into shelves!
Very cute! I have an old dresser that I just can’t stand anymore, but haven’t wanted to completely dispose of just yet. Now I know how to repurpose the drawers. Thanks!
I love this idea-I recently upcycled drawers from my great-grandmother’s vanity into nightstands for my tow oldest boys. I have a few more drawers left and have thought about making them into shelves for the bathroom to hold towels. Its nice because the vanity was not holding up well but now I can still have a piece of it in our home.
What a creative way to recycle drawers! gorgeous!
They look great! I have an old dresser in my kids playroom that I’m saving for “something”, and I think you may have helped me!
That is awesome! I am glade that we could help!
How did you hang these?
You are lucky if those 2 nails hold. I would suggest you check out something more secure next time. It’s a pain but once you find out what the wall is made of and where the studs are it will get easier (and safer) every time you repeat. Pre- drilling a smaller hole will help avoid splitting the wood, too.
I love that the drawer pulls are still there! It adds so much charm!
Thanks, Leanne!
I used drawers like this, stacked them in the same manner to store/display my rolls and rolls of ribbon in my sewing room. One has clear jars of buttons. Very cute, practical, efficient and best of all FREE!!!
What a great idea, Linda! Thanks for commenting!
i love these. Your treasures are so sweet. If I knew how to put a picture on here, I would show you the thread shelf I made by taking an old church silverware drawer and putting it on its side. I supported the back end with an old book and lined my threads up by colors on the separations.
Hi Margaret! Thanks for the comment! We would love to see your shelf — you can send us a picture over on Facebook here: https://www.facebook.com/Remodelaholic. Thanks!
I did put a picture on the FB page. I hope you enjoy it. I am sorry for the several mean comments there. Better to say nothing than something mean. I’m sure this little shelf fits into your home just perfectly. It is an inspiration to see items in a new light.
Thanks, Margaret! Facebook makes it a little hard for us to find things sometimes, so I will go make sure I find it! Thanks again for your support!
oops! Looks like My Repurposed Life puts it on my Facebook feed. I’ll try to put it on your page.
“1. Drawers. Preferably made of real wood. I found mine at a local thrift store. The nightstand they came from was $10 and I asked if I could just take the drawers and leave the nightstand for the store to dispose of. They obliged.”
Why in the world would you leave a great piece of furniture (minus the drawers) and not utilize that into small shelf unit, painted with your love of grey paint, using the paper in the back of the unit like you did the drawers. It was “two fer” right in your face and you asked the store to dispose of it? Are you not a recycler? I’m a remodeler, have been for over 30 years. What makes me successful is the creativity I use to not only to remodel, but to be mindful of HOW you remodel in reference to the environment and using the mantra of “repurpose, recycle, reuse” in my remodels.
I’m sorry, but this stood out to me like a sore thumb. I can’t even believe you passed up such an opportunity on your pursuit of an old idea (which originated on the concept of using drawers that were left over from furniture that was damaged or couldn’t be repurposed), and could have really capitalized on your blog with how you scored one piece of furniture and turned into TWO fabulous repurposed results.
Geez.
Hi Bettie! I agree, and we like to use every piece of whatever we can. This post is from a guest blogger from several years ago, just so you know. Thanks for sharing your thoughts with us!
I LOVE LOVE LOVE this idea! I can’t wait to get started on crafts and DIY’s again 🙂
Thanks for the comment, Lanae — send us a picture when you make yours! 🙂
I have these exact drawers only from a much larger dresser. I was internet searching ideas for their repurposed use and I’m going to do something like this.