DIY Sliding Barn Door + Inexpensive Hardware

Continuing on with Shut The Front Door DIYs: build an antique-style sliding barn door and hang it with inexpensive hardware! See everything shared so far here, and don’t forget to come link up your door-related projects here, plus tell us a knock-knock joke for a chance to win $25!
Hello Remodelaholic readers it’s Jaime from That’s My Letter here today to share my diy sliding barn door. You can build the door and install the hardware on this version for less than $100, keep reading and I’ll show you how.

How to Build and Hang an Antique Sliding Barn Door
There are many reasons why you would want to use a sliding door but the main reason I choose to make this door sliding is because it prevents the door from opening into the room which ultimately frees up floor space. The door glides along a pipe track and stays almost flush to the wall.

I actually took the existing door off the hinges and installed the pipe track with casters but you can also build this door fairly easily with just two steps, see down below for detailed plans.
The casters are very forgiving on our uneven wood floors. I used 2″ stationary casters however you can see there is a gap at the bottom of the door, consider smaller casters to lessen the gap.

Before you build this barn door I definitely suggest to measure your doorway and determine how wide your door needs to be. This door above is made from 1×8 tongue and groove pine boards. Tongue and groove boards are available in 1×6 and 1×8 so the number of boards and size will be based on how wide you want your finished door. (And yes you could build this door from straight boards without the tongue and groove as well.) Please note the plans below are based off of my door in the pictures above.
Download the printable woodworking plan HERE for the full material list, cut list, and assembly instructions.
This post contains affiliate links. Learn more and read our full disclosure policy here.
Easy DIY Sliding Barn Door Hardware from Plumbing Pipe
After building the easy barn door, next comes the hardware installation to make the door slide.
You will need the hardware pictured below to add your sliding door hardware and barn door wheels. Using plumbing pipe is an affordable way to make your own custom barn door hardware.

Materials to Make Your Own DIY Rolling Barn Door Hardware
- 2 – 1/2″ threaded floor flange
- 2 – threaded 1/2″ x 1″ nipple
- 2 – threaded 1/2″ 90-degree elbow
- 1- 1/2″ threaded pipe @ 72″ L
- 2 – large 1″ eye hooks to fit around the pipe
- 2 – stationary (rigid) casters (I used 2″)
- 2 – door handles (optional)

*I used all 1/2″ galvanized steel parts from the plumbing department.
Also note the nipple length is key here because that will determine how far away from the wall your door will hang. You don’t want the door banging into the moulding so a longer nipple might be necessary if you have thicker moulding.
See more DIY barn door hardware plus affordable pre-made barn door hardware HERE.

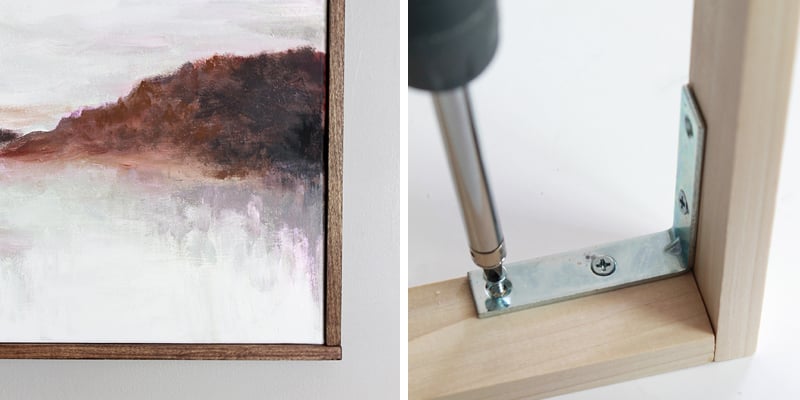
Step 1: Attach Casters
Attach casters to bottom of door flush on interior. You can see in the picture above from the hall the casters are wider than the door so you may consider attaching a 1×2 at the base of the door.

Step 2: Place & Attach Flanges
Determine where the pipe track will go by holding the door in place. Attach floor flanges to wall (using anchors and screws) then insert nipples and elbows.

Step 3: Attach Eye Hooks
Screw eye hooks into top of door and slide onto long pipe. Twist pipe into elbows. You have to do one side at a time and possibly unscrew the nipple, attach the pipe then rescrew the nipple.

Step 4: Add door handle hardware both on the interior and hall side.

Because I used the 1″ nipple my door clears the moulding and I have space for the door handle.

I hope you enjoyed this sliding barn door tutorial, it’s definitely an option to consider when thinking about space savings ideas and room flow plus the farmhouse feel adds so much charm. Happy Building!

——————Update 05/21/2016——————-
Reader Brag Post!

AnneMarie built this beauty! Here’s what she had to say about it:
I used ship-lapped barn wood I found at Home Depot. Loooove the gray finish and I figured it’d add a bit of pizzazz to my already bland apartment. My doorway is much bigger (@ 66in) and so I went for a 10ft pipe track in black to complement the gray door. Also used black caster wheels. I made the mistake of not accounting for the length I was losing due to the overlapping of the wood and ended up with a door that was 1) too short for my entry way by about a foot and a half and 2) had cross boards that were too long. What’s a girl to do but improvise? I decided to attached the cross supports diagonally, which I ended up really liking. I also ended up loving the fact that the door is shorter. It’s for my living room and a bigger door would’ve taken up all of my free wall to the left of the entrance, which I think would have been overwhelming. I spray painted my door handle orange for a dab of color. Thanks again for the blueprint. This was incredibly easy after reading your instruction! 🙂
Thank you for sharing! The improvising worked out wonderfully!
Do you have a project inspired by a post or tutorial here at Remodelaholic? Let us know!
More DIY barn doors:
- Simple Classic Cross Brace Barn Door Building Plans
- Reclaimed Wood Chevron Barn Door
- Barn Door Baby Gate + Dutch Door
- How to Make a Sliding Barn Door from an Interior Door
- How to Make an Existing Door Look Like a Wood Barn Door
Easy DIY Sliding Barn Door Hardware from Plumbing Pipe

Equipment
- 2 1/2" threaded floor flange
- 2 threaded 1/2" x 1" nipple
- 2 threaded 1/2" 90-degree elbow
- 2 1/2" threaded pipe @ 72" L
- 2 large 1" eye hooks to fit around the pipe
- 2 stationary (rigid) casters (I used 2")
- 2 door handles (optional)
Instructions
Step 1: Attach Casters
- Attach casters to bottom of door flush on interior. You can see in the picture above from the hall the casters are wider than the door so you may consider attaching a 1×2 at the base of the door.


Step 2: Place & Attach Flanges
- Determine where the pipe track will go by holding the door in place. Attach floor flanges to wall (using anchors and screws) then insert nipples and elbows.


Step 3: Attach Eye Hooks
- Screw eye hooks into top of door and slide onto long pipe. Twist pipe into elbows. You have to do one side at a time and possibly unscrew the nipple, attach the pipe then rescrew the nipple.


Step 4: Add Barn Door Handle
- Add door handle hardware both on the interior and hall side.
- Because I used the 1″ nipple my door clears the moulding and I have space for the door handle.


Notes

Published 30 Mar 2015 // Updated 21 May 2020


Hey Jaime. Thanks for the post! This looks like a great idea. I’m building a small garden shed and looking to put in a sliding door since there is not alot of space. This looks like it might work for my project. I was wondering; does your door sway in and out at the bottom without a track on the floor? Also, do the eye hooks touch the pipe, or does the pipe slide freely through them.
Thanks!
This is exactly the type of inexpensive DIY barn door tutorial I was looking for!! Thank you for posting this. I can’t wait to do this in our new house!
Be sure to send us a picture when you do! 🙂 Thanks for the comment, Sierra!
Made my own version. Would love to share butcan’t seemto figure out how to ayah an image. Thanks for the inspiration, you made the process super easy! ????
A-M
Hooray! We would love to see; you can send us a photo or two here: https://www.remodelaholic.com/share-brag-post/
Thanks, Anne-Marie! Can’t wait to see!
can you paint the hard wear or is that not a good idea
You could definitely paint the hardware, but the moving parts would likely mean the paint job wouldn’t last as long on those parts.
How did you do the finish on the door?! I LOVE IT!!!!
Thank you, thank you, thank you for posting this on the sliding door! You just saved us a TON of money with this simple DIY. We remodeled our master bath & really needed a sliding door to save space. All of the wall mounts were over $200 @ local hardware stores. We were already doing out lights in cast iron pipe, & the door never crossed our mind….duh. So now seeing this blog cast iron wall mount is a no brainer. Thank you again for being so frugal & smart! Keep up the good work.
Hoping to make this this weekend for my small bathroom – I could really use all the space I can get inside my bathroom and not having a door that swings open will help tremendously. 2 questions:
1) Does your door sway in and out at the bottom without a track on the floor?
2) Do the eye hooks touch the pipe or does the pipe slide freely through them?
Thanks for your prompt response!
Hello!
With the pipe and eye hooks, do they not make a grinding noise when you open and close the door? Thanks!
Use WD40.
Hi, Love this! I was wondering how did you insert the eye hooks without splitting the wood?
Thanks!
Jaime might be able to better answer this, but generally pre-drilling takes care of most splitting issues, in my experience 🙂
Three people have asked you:
1) Does your door sway in and out at the bottom without a track on the floor?
2) Do the eye hooks touch the pipe or does the pipe slide freely through them?
and you don’t answer……I would also love to know…..Thank you!!
Created my own version of this, using mostly the instructions provided…and it turned out great. Quite a few people have asked about the door swaying in and out at the bottom of the track on the floor. I have found that yes, this does happen. As i open and close the door multiple times, it slowly creeps away from the wall. Super annoying.
Not sure what my solution will be but I’m thinking of installing a track roller system behind the door. Attach the track at the bottom, paint it to match door and bolt a guiding roller to the baseboard. Should keep everything from sliding around too much 🙂
What a fabulous idea. I will be giving this a try. Thanks for sharing