Etta’s Bedroom Reveal
Over the last few years I’ve shown you little bits of what I wanted to do for Etta’s room, and a few of the things I was able to get done. Certain things I wasn’t able to finish when I got pregnant again.
Believe me when I say that lots of projects were put aside so that I could just be a mom and it was worth it. The room went from an unfinished nursery to a big girls bedroom pretty quickly, they grow up so fast. But we finally had to finish it up when we moved. And I was happy with it… even if it wasn’t exactly what I had planned.
")
You’ll notice I made a change in the canopy, I relaxed the drawback and rested it on the bed. I just painted the portion of the stenciled walls that stuck above the drapes.
Let’s not forget the before:

After:
")
We painted Justin’s childhood bed white (you can see it above). It was an orange-y stained wood before:
")
I used the rag rug that my grandmother made for her home when my mother was a child! I love this rug! It is one of my favorite possessions.
")
I rearranged all the paper lanterns that I had above Etta’s crib into a large collection right under the canopy. It was fun when we turned on one of the lanterns… (which I never remembered to photograph! darn it!) And you can see the stenciled wall, tutorial at the link.
")
")
")
You can check out the alphabet wall tutorial if you wanna try it for yourself.
We got the chair on Craigs list, a set of two wingbacks for $75 bucks. I bought a cover off of Walmart (they have a ton of options online, incase you are looking), and while it was very cool, it functioned so well and fit almost perfectly! I decided that I liked the green chair much better than the cover, because the color popped so much better with the green.
 |
 |
As for the window coverings, I switched out the drapes a few times and actually ended up using the drapes that had been in our family room before we added in the built in wall of cabinets and could no longer use them. They matched perfectly because the colors in my house really went throughout. (If you need help deciding colors for you house read the linked post, it is an easy way to think of color)

")
")
There it is, what do you think about the room?
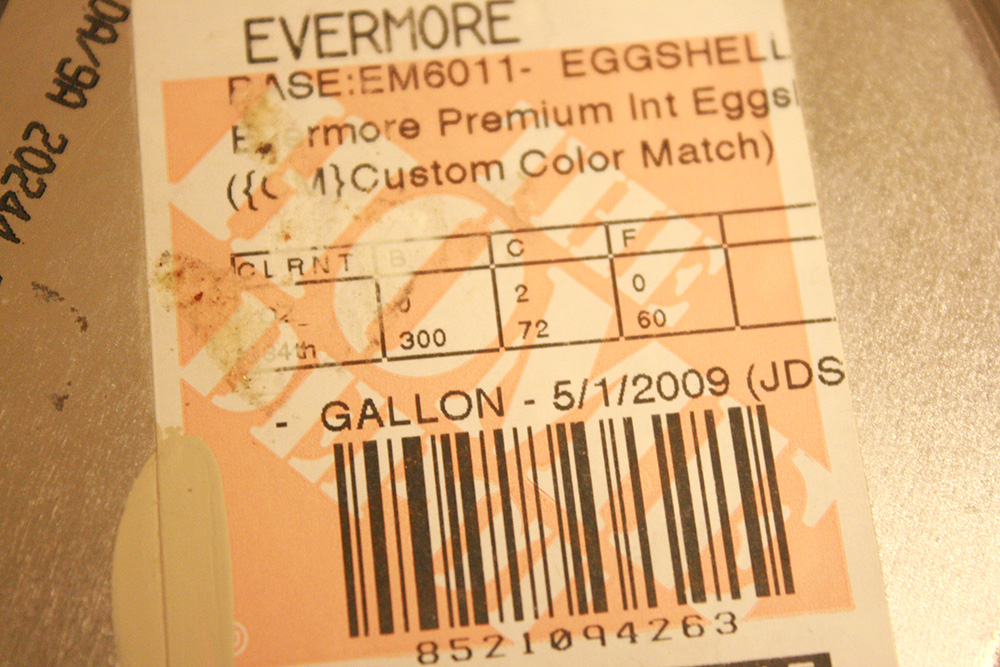
Here is the wall paint color that we used:
Cassity Kmetzsch started Remodelaholic after graduating from Utah State University with a degree in Interior Design. Remodelaholic is the place to share her love for knocking out walls, and building everything back up again to not only add function but beauty to her home. Together with her husband Justin, they have remodeled 6 homes and are working on a seventh. She is a mother of four amazing girls. Making a house a home is her favorite hobby.


Very sweet, indeed. It is beautiful and you turned that ‘out-dated’ chair into an asset and accent piece – great job! My only question, where is all of her stuff? Do you have a separate playroom elsewhere in your home? That aside, the colors are so vibrant and lovely.
She had a walk in closet where most of her clothes etc were stored (the tan painted door), but for the most part we kept all the toys in our family room and playhouse.
Adorable, great work!!!
Thanks!
Amazinnnngg
Thank you Chrissy!!!
such an adorable space! love the rag rug.
Thank you Jessica, I love it too!
it’s adorable! i love that rug- what a treasure!
Cassie, Thanks, I really love it too, and the colors are so now! It will be one of those items I will love forever!
What a fun girls room! Love it.
Thank you Rachelle!
great job, love that rug, can you tell us what kind of fabric it’s made of and any links to how to make one? thanks!
Elaine, Cassity was planning on making a tutorial in the future. We are glad that you like it. She mentioned that you have to use a duck cloth or something similar that is tough enough.
Adorable! I love the stenciled wall (and how easy it was!)
Light fixture?
Lovely colors and the rag ug is awesome.
This is really adorable Cassity and Justin. I bet Etta LOVES it!
I am working on my little girl’s room at the moment (she’s 19 months now) and the bed I’m ‘creating’ is really similar to the one you have.
xoxo
Kristine, since you are one of my favorite designers that REALLy makes my day! I can’t wait to see what you do with your daughter’s room! And holy cow, I cannot believe how grown up she is getting already. It goes SO fast!
(this is Cassity, I am signed in as Justin right now…)
So darling!! Where did you get the butterfly prints? They are just what I’ve been looking for!
Trish, I got them last summer at Kirklands, so i am not sure if they still have them. If you don’t have a local store they may have the prints online.
cute bedroom ! I wan to have this kind of style for my baby.
The alphabet wall is so cute.
Thanks Carrie!
Hi, Cassity!
I love the projcets that you and the hubs create- it has inspired me to pick a new color palette for our home. One question: I am looking at similar colors of tan and teal like you used in the room project above. Do you remember the brand/color name that you used to paint the walls?
Thanks. : )
Lindsey, I updated to post with the paint color that we used. It’s at the bottom of the post. I hope that helps. Thanks for loving our projects.
Can you tell me about how / what you did for the drawers under this bed? Did you make that or were those already there prior? Thanks!
It is actually just a trundle bed with drawer hardware. It was my husband’s childhood bed! We just painted it… Maybe we could make a plan for how you could make it as a drawer! I will stew over it for a while!
Wow you did a beautiful job! I do however think that it could use a little more orange from the rug and pillows brought in though. Just to make it pop more. Maybe the lamp (or at least the lamp shade) could be orange, and maybe a thin pencil striped swirling design done in orange could be added to every other blade on the ceiling fan. But that’s just my thoughts. It looks gorgeous!