Kitchen Island Makeover With Corbels: Part Two
Here is where we left off with the kitchen island makeover. It is looking pretty good, but we are about to add the final touch that makes it look 100% better. We had ordered the corbels, but they hadn’t arrived yet when we finished the moldings. But we did all we could up to that point.

I did some research for the right corbel. The ones at the local hardware stores didn’t quite have what I was looking for. I looked online and found a great website for corbels called Prowood Market. They are located in Atlanta Georgia. It took about two weeks for us to get the corbels from the time of ordering. Just keep that in mind if you are working with custom corbels.
This is the one that we went with, Wood Corbel 22T3. It is red cedar with a smooth sanded finish at 3 1/2” wide. I got it in a smooth finish because we were going to paint it.
 |
 cedar plug |
Once I received them in the mail at my house, I had to do a little bit of prep work to get them ready to be installed. I pre-drilled two holes on top and two on bottom to screw the corbels to the kitchen island. The holes were about 3/8” wide to hide the screw head. They also sell cedar plugs that we bought to cover the screw heads. They were 3/8” plugs.
 |
 |
 |
 |
 |
 |
With this island’s shape, there are two 22.5 degree corners that are going to get a corbel. in order to install the corbel I had to notch out the angles on the table saw, as you can see below.
 |
 |

Now that the corbels are cut and ready ready, we were able to install them. Here we are testing them and making sure that they were going to fit.
In addition to the screws, I wanted to use glue to give an additional hold. I could have used liquid nails as well. I just happened to have the wood glue available. We did accidentally use a bit too much, cuz it dripped, and we had to watch for drips and wipe them off right away before they dried! so watch out for drips!
 |
 |
Here are the 3/8”cedar plugs being glued in place.
 |
 |

Once all the plugs were in place and dried, I cut them flush with the multi-tool flush cut saw bit. ( I love my multi-tool!) After they were all cut flush we patched them with wood filler and later they were sanded those when they dried. Now they are ready for caulk and paint.
 |
 |
We had a really fun time running around at Nates’, and the girls loved it there. I just had to throw in these pictures of Etta playing with their pet bird “Patches”. It was fun to have Etta and Lydia there playing with his daughters while we were working on the kitchen island. Like old times…
 |
 |
 |
 |
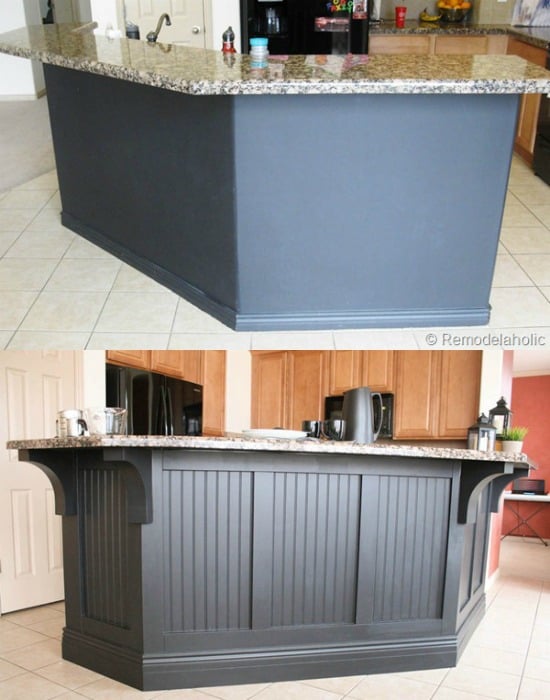
Remember how the kitchen island looked before we did anything?

Here is the kitchen island makeover with everything finished. A little bit different right? Nate and his wife really loved how it turned out. It looks so much more grand and is a great focal point for the room! And the big bar now it makes a lot more sense that the corbels are there holding up the heavy granite.


Don’t forget to check out the first half of this post!
What do you think of this amazing kitchen island makeover? Do you like how it turned out?

I am the husband of the amazing Cassity of Remodelaholic. I love to problem solve and to design and build things inside and outside the house to make life better. I am a professional Landscape Architect by trade and love the outdoors.


Cassity those corbels are perfectly suited for your island. I’ve been debating for 2 years now and you’ve given me the good ahead to take the plunge. I always thought they’d ‘be in the way of everyone’s knees’ but looking at yours it doesn’t seem to be an issue. Thanks for the inspiration.
As long as they are spaced far enough apart you shouldn’t have a problem.
Really gorgeous! The thick moldings and the chunky corbels were a great choice.
I am very glad that we went with the thicker corbel too. Thanks for liking it.
This really looks fantastic! Your design has inspired me to try something similar with the end caps of my bottom cabinets.
That is great news, I am glad you found it inspiring.
This is amazing! Love the color, love the corbels and how they are notched to fit the angle. Very nice. I would have loved the X’s in the original sketch, too….
You and Cassity both.
Oh My Goodness! Yes! Love how it turned out. It is hard to believe that’s the same island.
Wow…what a difference! The corbels add so much interest and character to the island. Thanks for sharing…so happy to have found remodelaholic.
melinda
You are very welcome! Please come back often!
I’ve been planning a kitchen remodel for a while now and have decided on white cabinets but I’ve been debating with myself whether or not to turn the island black. This definitely helped sway me to paint it black. It looks really great! I can’t wait to show this to my husband considering we’re big DIYers and he insists on practically building our whole new kitchen haha. Thanks for posting this remodel!
Bree, you are welcome. We are glad that this could help.
So I have to brag and admit that this island is OURS!! And it looks exactly like this (well, plus the mess of four kids most of the time!) Justin and Cassity did amazing work and it was so fun to have the island look like it “belonged” in the scheme of the house. It was such a letdown to buy a larger house, only to move in and really find out that they cut corners on so many things (like putting in a proper island, for instance!) The island really makes the kitchen and I can’t even tell you how many compliments we get on it!! Black was an amazing color choice for us. I can’t share enough how much we love, love, love (and one more “love” for good measure!) this addition to our kitchen! Amazing transformation, amazing couple. Thanks guys!
(What we gonna remodel next? 🙂
Oh my goodness – I can’t even believe how that island began compared to how it looks now! What a custom look – stunning!
Thanks Jenny! I was a fun transformation!
Enjoyed reading about this kitchen island transformation. I have one question. How was the corbel attached underneath the granite. I noticed screw holes were drilled but no details on how that was done. Would like to attempt a similar project.
Gary, there was a layer of 3/4″ plywood under the granite countertop that I was able to screw into.
I would like to see a picture from the other side, I am debating on making an island with the angles you used, Im curious as to how the space is used from the other side?
George, I don’t actually have images from the other side, since we helped our friends with this project in their home. But they have a sink in the center and a dishwasher in one third on the left hand side of the double sink, and i think just a regular base cabinet on the other third. Hope that helps.
It looks fantastic! I love it! And good for them for going with the black! That can be scary!! Would love to see some great door knobs and drawer pulls on their cabinets and a great color on the wall to finish it all off! Great start though!!!
why the holes in the top of the corbels? did you drill into the granite top?
The granite sits on top of a layer of 3/4″ plywood. I was able to screw the corbel to the underside of the counter.
Amazing. You have inspired me to do something similar in my kitchen. Keep up the great posts!
You are welcome! Glad you liked it so much.
I like the design. I notice my cabinets only use 1×1 for cabinet frames- how did you connect the stiles and the crossbars ? doesn’t seem like there is anything to nail it to.
Len
Len, the styles and rails were all nailed with a nail gun. If you don’t have a 2×4 to nail to, you have to nail more and at alternating angles. That will help hold the styles on tight. The caulking will also help hold in place.
Great post! I have it bookmarked bc I plan on showing my contractor what I want done (sadly, we are rotten diy’ers in my house). My island is exactly the same shape as theirs and I’ve wondered what the best way would be to do the corbels. Now I know! I also love the woodwork. I was bummed to fun out I couldn’t get the finished look of my new cabinets on the back of the island, but what you’ve done here is perfect.
Gretchen, we are so glad that this post has helped with your plans. I hope everything turns out great for yours.
Looks fantastic! I have been planning to paint our island black and add wainscoting but I hadn’t thought of the trim. It looks so finished. Now if I can ever get done with my stair project I can add this to our list. Thanks for posting your year in review, I love your work.
Thanks for the comment Justine! And thanks for loving our work!
We copied your plans to some aspect and it led to an entire kitchen redo. Not replace, but redo. New appliances, had our cab’s, island and pantry door done by Nhance. Highly recommend if your dog likes to jump up or scratch at things.
Nice job, and thank you for the idea.
Vicki, you are welcome!
This project is beautiful! We have been wanting to do something like this. My only question is did you paint the other side of the cabinets black as well or is the black board and batten just on the front and it’s just the natural finish below the sink area?
The other side was not painted, just the front sides that you see.
We are in the process of building a new house…..our island is the same style as yours. I have been trying to decide how I wanted to do it and came across yours on pinterest. Needless to say my search is over….your island is beautiful!!!!!
I am glad that you like it and found it helpful.